2011 mini knife KITH

Ok, well I'm on the fence about wheather or not I should cold blue my mini to more replicate the original? I don't have the stuff to parkerize, which is what the original has, or hot blue, or nitre salts. Do any of you think Birchwood Casey cold blue would work well for the two different steels I am using? Its 1080 blade and guard is mild, pomel will likely be mild as well.

Or just leave it in the white?


-Xander
 
Ok, well I'm on the fence about wheather or not I should cold blue my mini to more replicate the original? I don't have the stuff to parkerize, which is what the original has, or hot blue, or nitre salts. Do any of you think Birchwood Casey cold blue would work well for the two different steels I am using? Its 1080 blade and guard is mild, pomel will likely be mild as well.

Or just leave it in the white?

-Xander

My experience is that the different steels will take the cold blue differently. this may cause a neat look but also may look strange. so I guess what I am saying is.... I have no Idea! ;)

Mike - that is turning out to be a beauty!
Stacy - I am really looking forward to seeing photos.
 
Ok, well I'm on the fence about wheather or not I should cold blue my mini to more replicate the original? I don't have the stuff to parkerize, which is what the original has, or hot blue, or nitre salts. Do any of you think Birchwood Casey cold blue would work well for the two different steels I am using? Its 1080 blade and guard is mild, pomel will likely be mild as well.

Or just leave it in the white?


-Xander

A simple alternative is to soak the blade in boiled very hot white vinegar for a black look. It will rub off but I bet it is fine for a mini.
 
A simple alternative is to soak the blade in boiled very hot white vinegar for a black look. It will rub off but I bet it is fine for a mini.

How easily does it rub off? Will handling ruin it or more aggresive type abrasion take it off?

Sounds like a viable alternative.


Working on the stacked leather handle now. Doing a dry run before I glue it up or to my fingers with the CA. I will post pics in a bit.

2011-06-21130049.jpg


Time to turn the record over and pour another Cuba Libra!


-Xander

Well here it is all glued up and just about the right length! Hopfully I can carve and turn it down to final shape easily.

2011-06-21133724.jpg


Cheers-
 
Last edited:
Here are some quicK shots of the blade, koiguchi, tsuba, and habaki.
The tsuba is laminated sterling and copper, the koiguchi is sterling, and the habaki is copper. Blade ha is 3.5".
 

Attachments

  • mini tanto 005.jpg
    mini tanto 005.jpg
    67.9 KB · Views: 38
  • mini tanto 002.jpg
    mini tanto 002.jpg
    60.9 KB · Views: 26
  • mini tanto 007.jpg
    mini tanto 007.jpg
    51.9 KB · Views: 36
Fast14 - Looks like everything is coming together! will you be able to pull the mock up off and slip it onto your KITH knife or will you start from scratch again?

Here are some quicK shots of the blade, koiguchi, tsuba, and habaki.
The tsuba is laminated sterling and copper, the koiguchi is sterling, and the habaki is copper. Blade ha is 3.5".
Stacy - I can't believe you are going traditional on the koiguchi and habaki, that takes some kahones!
 
Stacy, your work is always impressive! Can you recommend me a decent set of really small files? All the ones I have are just too large for most work on minis especially the guard. I am really enjoying working on my mini and am trying to collect more tools for them. I just got a set of tapered reamers that I can use.

How about everyone else, are you using tools just for working in miniature? Making your own tools as needed? Or just using what you have?


-Xander
 
Fast14 - Looks like everything is coming together! will you be able to pull the mock up off and slip it onto your KITH knife or will you start from scratch again?

Ryan, it is already off the mandrel and I started truing up the sides to prepare for turning it down closer to shape. It fits perfectly onto the tang of my knife. I polished the mandrel and the two plates with some car polish to act as a release agent, that and a bit of heat from a Bic lighter I was able to pull it right off. The CA didn't penetrate as deeply as I hoped so its sand and add more glue, sand and add more glue. We'll see if everything works out in my favor, so far so good.


-Xander
 
Grobett - Vallarobe escapement files are superb for miniature work, as they are made specifically for watchmakers.
They are smaller and thinner than needle files. Most major brands of escapement files are good,too.
Escapement files cut size runs from #00 to #6 The #0 is great for rough filing of slots and plunges, and then #2 and #4 for finishing up.If you only buy one cut, get #2. Be aware that espacement files are not cheap. A set of 12 runs about $150, sets of six are $70-80. They are sold individually for $10-15 each.The barrette shape is the one you will use most of the time.

My other favorite file type/Brand is the Valtitan needle file. These are special made and Rockwell at Rc72. They are a bit larger than the escapement files. They sell for about the same price - $10-15 each, and $70-80 a six file set. Needle files come in cut size 0,2,4,6. #6 will leave a finish about the same as 180 grit paper. The #2 is the most useful, with #0 being really good for rough filing.

Be aware that any abuse or overflexing of these types of super hard and super thin files will snap off the blade in a heart-beat. This is about the same as tearing up a $10 bill and tossing it in the trash can. When I break one, I keep the broken piece and use a pin vise to hold it . That sometimes works better than the small handle did. Using a metal file handle on escapement and needle files is always a good idea, anyway.

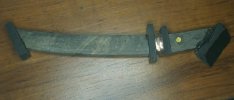
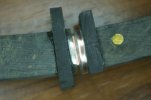
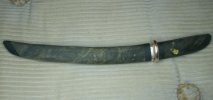
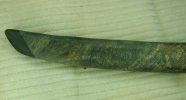
Not everybody needs or wants such expensive files. The Chinese needle file and escapement sets sell for $10-15 a set. They are certainly not going to last like the top grade ones....but they are less than 1/10th the cost. I keep several sets and use them for the jobs that don't require extreme hardness, or the tasks that easily snap a file. When worn down or damaged, I use them as stock to make mini knives and swords. They are often listed as "Economy Files".
Here is a link to a seller showing both side-by-side.
http://www.asapwoodworking.com/inde... Pattern Needle File Sets For Template Making

The search words for on-line searches are Escapement files. Needle Files, Watchmakers files. Brand searches are Vallarobe, Grobett, and Valtitan.

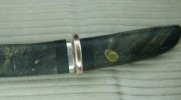
Needle files can be re-shaped and ground down for specific mini knife making tasks. Use your belt grinder and a 120 grit belt to carefully ( avoid heating the file) grind a file thinner and smaller. Only make these files about 1" long. This makes for easy filing of guard slots. Often a set will have shapes that you don't need....or you break a file....use these to re-shape into special files. Remember that the thinner and smaller the tip, the easier it breaks. Use mini files with as little pressure as possible. If you bend it it will break.
 
Ryan,
If you look at the koiguchi, you will see small strips of silver that will project down into the throat of the saya. These are an idea I came up with to help hold on such small metal koiguchi. They also help grip the habaki a bit, to make the saya fit the sword better. Sheath fit on minis is usuall pretty sloppy, as a few thousandths of an inch is all that stands between too tight and too loose.

The habaki is made in the standard fashion, folding a piece of copper and forging it to the blade shape ,with the fold at the ha side of the nakago. Then a piece of copper is slid in the open side to seat flush against the mune side of the nakago. This is clamped in placed, removed from the nakago, and hard silver soldered together. From there it is a ,matter of shaping and filing. A few taps on the habaki as you seat it to the nakago will refine the shape to a smooth fit. Then tapping it forward to seat it to the machi will get everything lined up for the machi slots.

An alternative method is to start with a short piece of copper/silver tubing, and flatten it. Then forge it to the nakago. This works best on very small habaki.

Whatever method you use, annealing the metal often is important when shaping a habaki.....full size or mini.

The final photo shows how snugly all parts fit together.
 
How easily does it rub off? Will handling ruin it or more aggresive type abrasion take it off?

Sounds like a viable alternative.

Cheers-

It will rub off some, try several applications.

Lol, I was hoping some of the more experienced guys would chime in... not sure this is the best solution. Ferric chloride would work well or you could get a parkerizing kit, the chemicals are not very expensive. Nice work!
 
Stacy thanks for the info. I will check it out for sure. The only needle files I have are from Harbor Freight only because they were the only place that had such files in stock. They are almost useless. There are two goldsmiths and a watch repair place within 5 minutes walk of my house, so maybe ill stop in and ask if they have any broken files or if they can save them for me when they do break. Might be worth it.

Gonna try and get the handle finished up today, will update with pics.


-Xander
 
I just read that if you etch with Ferric chloride then before rubbing the oxidation off you boil the blade in Baking Soda it will neutralize the FC and set the black... I am guessing that during use (No matter what method you use) The black will come off, even hamon's fade with use as the blade gets marked up.

Since this is a mini and most likely not going to see heavy use you could use some type of clear coat when you have the finish you like?
 
<snip...>Since this is a mini and most likely not going to see heavy use you could use some type of clear coat when you have the finish you like?

I tought about this, but just like on my models no matter how thin the clear coat is it always tends to flood the piece. Small details get washed out and filled with clear coat. Unless I can figure out some sort of vapor deposition method.


-Xander
 
I have used MolyResin Clear, it is a bake on (300 F) product similar to gun kote. I use an airbrush to spray it on and covers paint nicely. I will have to try it on a blade some day to see how it works.
 
A quick update shot...

2011-06-22093229.jpg


I'm excited about how this is turning out! The stack looks great. More pics later...


-Xander
 
Does anybody have any suggestions for putting a makers mark on these? My 1/8" stencil is just too big to look right.

Also, seeing that many makers number their knives, do you count these in the number list?

Xander, you should use a leather punch to punch out little circles for your handle. Might save you some time on the next one. You could even use two different size circles to give the ribbed look of some k-bars.

Don't know what to tell ya about a mark. I would think that counting the minis seperately would be more appropriate.

Yeah next time I am going to start the stack much closer to final size, sanding this has been actually rather difficult. I am going to cut the grooves into this handle like the original but will do so after final fitting to the tang because the stack is getting quite delicate the thinner it gets.

Well my son is feeling better so he can go back to day care today and I can get some stuff done around the house and work uninterrupted most of the day.


-Xander
 
The saya and tsuka are coming out good so far. I'll shoot photos tonight and try and show the steps. This is shaping up to be my best mini tanto.
 
Here are the photos.
The piece of buckeye burl was split and one side mortised to fit the blade. The other piece was mortised only to fit the shinogi. The two pieces were then glued together and trimmed up.It was then cut in half at the habaki end. The ebony koiguchi and ends were glued on, and the metal koiguchi was fitted. After checking that all fit perfectly, the excess was sanded away. It will get a sealing and penetrating coat of CA and then be final sanded. The mekugi will be trimmed flush after all is sanded and buffed.
 

Attachments

  • mini tanto 002.jpg
    mini tanto 002.jpg
    31.5 KB · Views: 22
  • mini tanto 006.jpg
    mini tanto 006.jpg
    36.7 KB · Views: 21
  • mini tanto 003.jpg
    mini tanto 003.jpg
    39 KB · Views: 19
  • mini tanto 004.jpg
    mini tanto 004.jpg
    31.7 KB · Views: 29
  • mini tanto 009.jpg
    mini tanto 009.jpg
    38.3 KB · Views: 23
Back
Top