-
The BladeForums.com 2024 Traditional Knife is available! Price is $250 ea (shipped within CONUS).
Order here: https://www.bladeforums.com/help/2024-traditional/
You are using an out of date browser. It may not display this or other websites correctly.
You should upgrade or use an alternative browser.
You should upgrade or use an alternative browser.
Beckerhead Knife Making and Modification Thread
- Thread starter granitestateofmind
- Start date
- Joined
- Mar 7, 2014
- Messages
- 937
Okay guys I'm not sure if this is the correct thread for this question or if it should be in a more maintenance oriented thread so apologies for any derailment.
I just got a bk 16 a few days ago. Other than a few strokes on a strop when i first received it I haven't actually sharpened it. I am aiming to put a slightly less obtuse edge on it than the factory one however this is my first experience with Kabar's 1095 Cro Van and I am thus unsure as to its edge retention capabilities, so my question is what would be the edge you would put on a 16 for general woods bumming and bushcrafty type nonsense.
All replies appreciated,
James.
- Joined
- Mar 7, 2014
- Messages
- 937
Yeah I was just trying not to bog up the place with a pretty simple thread. I have used it, made several try sticks which is why I said I was looking for a less obtuse angle than the factory one I was just wondering how far I could go as I'm assuming I won't be able to thin it out as much as something like s30 v.
Thanks for the response TravisH, good looking out man :thumbup:
Thanks for the response TravisH, good looking out man :thumbup:
daizee
Knifemaker / Craftsman / Service Provider
- Joined
- Dec 30, 2009
- Messages
- 11,194
Yeah I was just trying not to bog up the place with a pretty simple thread. I have used it, made several try sticks which is why I said I was looking for a less obtuse angle than the factory one I was just wondering how far I could go as I'm assuming I won't be able to thin it out as much as something like s30 v.
Thanks for the response TravisH, good looking out man :thumbup:
I would expect you to be able to thin it out MORE than ANY stainless steel EXCEPT the razor steels.
- Joined
- Mar 7, 2014
- Messages
- 937
Right ok. Like I said I haven't had any prior experience with the steel and I didn't want to start playing around and muck up a good knife. Thanks for all the replies here guys I really appreciate it. I think I might need to break out the mousepad today...
- Joined
- Mar 7, 2014
- Messages
- 937
Yeah I free hand so everything's gonna be an approximation but I'm thinking 20 dps (it's certainly a lot steeper than that now) and maybe softening the shoulders a bit.
- Joined
- Mar 13, 2015
- Messages
- 1,022
The work-sharp do the job just fine !!!Yeah I was just trying not to bog up the place with a pretty simple thread. I have used it, made several try sticks which is why I said I was looking for a less obtuse angle than the factory one I was just wondering how far I could go as I'm assuming I won't be able to thin it out as much as something like s30 v.
Thanks for the response TravisH, good looking out man [emoji106]
- Joined
- Dec 3, 2010
- Messages
- 1,875
This early Mountain Knife (mine) had a crude sheath from before I settled into my style. It was time to make a new mini-bushcraft for it:


Selecting wood for a handle, then fitting:


I love the look of your handles Daiz, that Mountain Knife looks like it just plain kicks booty. Plus that sheath turned out nice. I am really starting to dig the square bottomed sheaths. I really wish I could get out into the garage more but school is keeping my head firmly underwater. The knife I'm still working on is in A2 solely because of your recommendation many snarks ago! I have a pile of designs, templates, and steel, just no commitable time!
- Joined
- Dec 3, 2010
- Messages
- 1,875
Okay ladies and jelly spoons, did some more work for my BK2 mod today, its been a long process but I wanted to do a bit of experimentation with the stock grivory scales using a process I have not seen done before with the scales... Stonewashing! Forgive the photography its fairly slapdash this time around. I made this a project for kiddos and I...
First things first I scrubbed the scales with 500 grit wet and dry just to give them a glazed up look and sort of "level the playing field" so to speak. Then I laid the tang side out with some blue painters tape and cut around the scales. I did this to mitigate any edge damage that might occur to the scales, I dont think it helped too much, I would probably recommend duct tape. Next I found a old coffee can/jug/container thing, and went outside with the kiddos. We are in the processes of demolishing an old BBQ pit in the backyard so for the stones for the stonewashing I used pieces of concrete and broken bricks. Me and the kiddos dug around and hunted for the perfect ones. Next I threw the scales in, covered them in the rock and went to town shaking it up... or shaking it off and T Swift says

Just to kinda check for a baseline of the "damage" here is just after less than a minute of shaking it off, or up... whatever. Made a heck of a noise which the kids thought was hilarious and we also took turns throughout the process. Here they are washed up after the short little shimmy shimmy.

Threw them back in the can and then gave them a good couple minutes of shaking and baking. This is what they look like coming straight out of the rocks... covered in dust. Actually kind of neato looking.
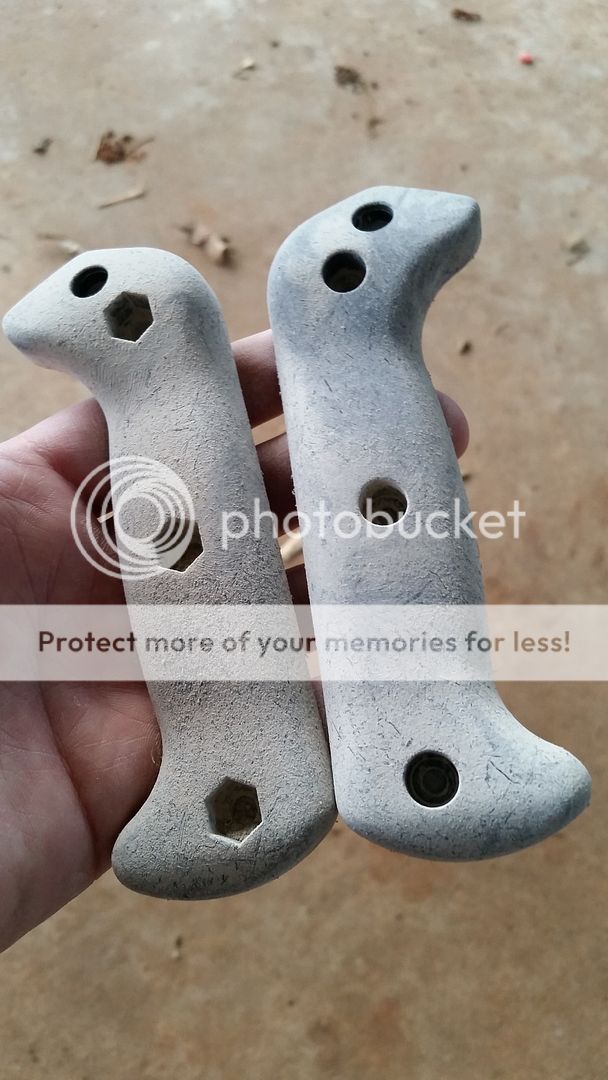
and here they are after washing them up with soap and a scrub brush...

Some close ups of the damage... like they have been living on a gravel country road for a couple years")


To finish these up I went ahead and hit them up with a little bit of fire, and then gave them a rub down with some beeswax. I then wiped off any excess until they were dry.
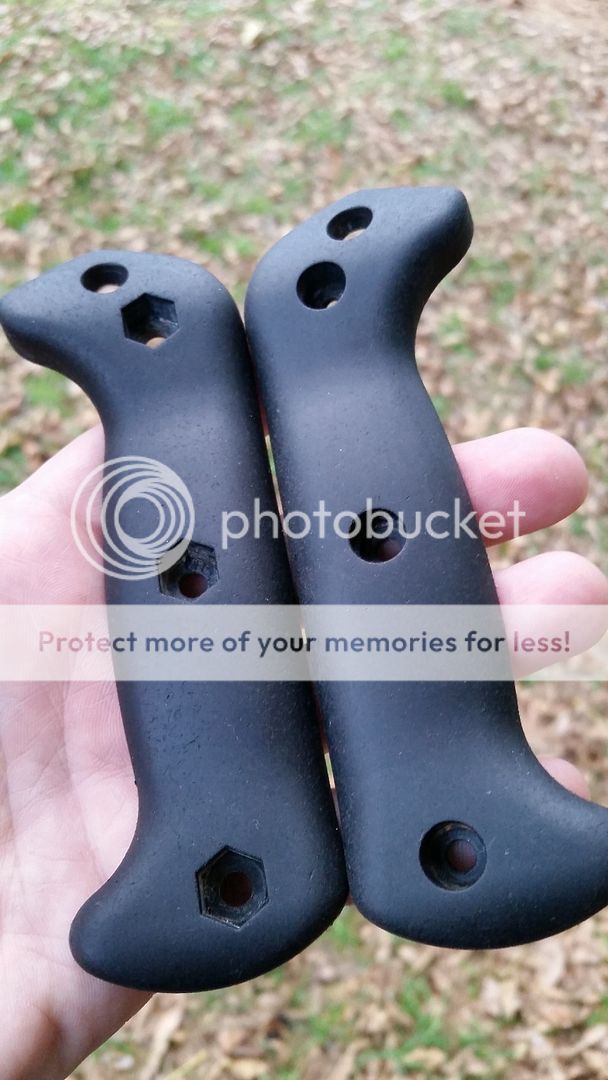
The end result is pretty cool. They are roughed up, but they still feel soft, almost like hard rubber not abrasive just frosty not quite tacky. I have stippled scales before and did not end up liking it all that much, this adds grip without the roughness. I also took some "loupe" shots to get some close ups of the texture.


I got closer but I think you get the idea
Here is a comparison between my BK5's stock scales. Next time I am at the hardware store I am picking up stainless hardware for the BK2, but I may do something a bit different, dunno yet.
There is a big difference here in traction. I am not huge on needing traction on scales, but I am modding this BK2 out as a "kit" knife so I figured some extra grip would not hurt. Plus people are always looking for ways to improve grip on the Becker scales, so I wanted to make/try something that was cheap (uhhh free?) easy, and effective. Plus its an option that doesnt destroy the ergos of the handle or provide so much grip that it ends up being abrasive. I want to experiment with this more with some different materials like micarta/zytel etc. Also it might be cool to stonewash it, paint it, and then stonewash again for a sort of distressed look.
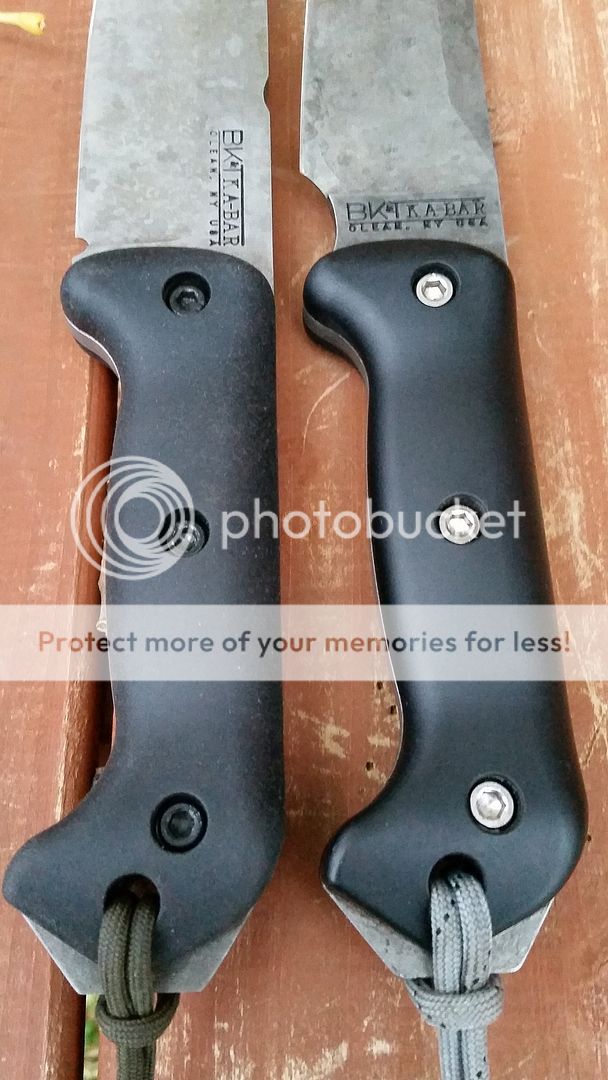
And here it is sans sheath. FYI regrinding the 2 was the best thing I have done for it... it cuts like a mora with its BK2 backbone. I have also battoned it with this geometry through knots with no edge damage. The geometry is really stable and cuts so well.

First things first I scrubbed the scales with 500 grit wet and dry just to give them a glazed up look and sort of "level the playing field" so to speak. Then I laid the tang side out with some blue painters tape and cut around the scales. I did this to mitigate any edge damage that might occur to the scales, I dont think it helped too much, I would probably recommend duct tape. Next I found a old coffee can/jug/container thing, and went outside with the kiddos. We are in the processes of demolishing an old BBQ pit in the backyard so for the stones for the stonewashing I used pieces of concrete and broken bricks. Me and the kiddos dug around and hunted for the perfect ones. Next I threw the scales in, covered them in the rock and went to town shaking it up... or shaking it off and T Swift says

Just to kinda check for a baseline of the "damage" here is just after less than a minute of shaking it off, or up... whatever. Made a heck of a noise which the kids thought was hilarious and we also took turns throughout the process. Here they are washed up after the short little shimmy shimmy.

Threw them back in the can and then gave them a good couple minutes of shaking and baking. This is what they look like coming straight out of the rocks... covered in dust. Actually kind of neato looking.

and here they are after washing them up with soap and a scrub brush...

Some close ups of the damage... like they have been living on a gravel country road for a couple years


To finish these up I went ahead and hit them up with a little bit of fire, and then gave them a rub down with some beeswax. I then wiped off any excess until they were dry.

The end result is pretty cool. They are roughed up, but they still feel soft, almost like hard rubber not abrasive just frosty not quite tacky. I have stippled scales before and did not end up liking it all that much, this adds grip without the roughness. I also took some "loupe" shots to get some close ups of the texture.


I got closer but I think you get the idea
Here is a comparison between my BK5's stock scales. Next time I am at the hardware store I am picking up stainless hardware for the BK2, but I may do something a bit different, dunno yet.
There is a big difference here in traction. I am not huge on needing traction on scales, but I am modding this BK2 out as a "kit" knife so I figured some extra grip would not hurt. Plus people are always looking for ways to improve grip on the Becker scales, so I wanted to make/try something that was cheap (uhhh free?) easy, and effective. Plus its an option that doesnt destroy the ergos of the handle or provide so much grip that it ends up being abrasive. I want to experiment with this more with some different materials like micarta/zytel etc. Also it might be cool to stonewash it, paint it, and then stonewash again for a sort of distressed look.

And here it is sans sheath. FYI regrinding the 2 was the best thing I have done for it... it cuts like a mora with its BK2 backbone. I have also battoned it with this geometry through knots with no edge damage. The geometry is really stable and cuts so well.

- Joined
- Dec 3, 2010
- Messages
- 1,875
Great write up IWHAF! Could you give a bit more detail on the grind Work? Looks like you took down the saber edge, was there more to it?
Sure! Although I did not take any in process pics or anything. Essentially I raised the grind up some, and then took the grind down to the edge at zero, leaving the tip basically alone. Then I completely blended everything together, from the flat down to the edge. Added a little bit of a convex microbevel around 20 degrees, and then convexed the edge at the tip. So I have a thin edge, on a thinned out grind, but the tip was left thicker and then convexed so it would be "stouter." To give you an idea of what was removed, the bk2 weighs in at 16 ounces, mine weighs 14.7 ounces. It cuts so much better its ridiculous. The grind is thin at the edge and gradually builds up so it bites and sheds wood real well.
I also reworked the spine and added a ferro rod notch. From the ferro notch back towards the handle the spine has softened edges for comfort, and then from the notch to the tip the spine is squared for striking a rod or scraping stuff for fire tinder. The back pommel has also been squared up for another scraping area.
- Joined
- May 22, 2013
- Messages
- 477
Okay ladies and jelly spoons, did some more work for my BK2 mod today, its been a long process but I wanted to do a bit of experimentation with the stock grivory scales using a process I have not seen done before with the scales... Stonewashing! Forgive the photography its fairly slapdash this time around. I made this a project for kiddos and I...
First things first I scrubbed the scales with 500 grit wet and dry just to give them a glazed up look and sort of "level the playing field" so to speak. Then I laid the tang side out with some blue painters tape and cut around the scales. I did this to mitigate any edge damage that might occur to the scales, I dont think it helped too much, I would probably recommend duct tape. Next I found a old coffee can/jug/container thing, and went outside with the kiddos. We are in the processes of demolishing an old BBQ pit in the backyard so for the stones for the stonewashing I used pieces of concrete and broken bricks. Me and the kiddos dug around and hunted for the perfect ones. Next I threw the scales in, covered them in the rock and went to town shaking it up... or shaking it off and T Swift says
Just to kinda check for a baseline of the "damage" here is just after less than a minute of shaking it off, or up... whatever. Made a heck of a noise which the kids thought was hilarious and we also took turns throughout the process. Here they are washed up after the short little shimmy shimmy.
Threw them back in the can and then gave them a good couple minutes of shaking and baking. This is what they look like coming straight out of the rocks... covered in dust. Actually kind of neato looking.
and here they are after washing them up with soap and a scrub brush...
Some close ups of the damage... like they have been living on a gravel country road for a couple years
To finish these up I went ahead and hit them up with a little bit of fire, and then gave them a rub down with some beeswax. I then wiped off any excess until they were dry.
The end result is pretty cool. They are roughed up, but they still feel soft, almost like hard rubber not abrasive just frosty not quite tacky. I have stippled scales before and did not end up liking it all that much, this adds grip without the roughness. I also took some "loupe" shots to get some close ups of the texture.
I got closer but I think you get the idea
Here is a comparison between my BK5's stock scales. Next time I am at the hardware store I am picking up stainless hardware for the BK2, but I may do something a bit different, dunno yet.
There is a big difference here in traction. I am not huge on needing traction on scales, but I am modding this BK2 out as a "kit" knife so I figured some extra grip would not hurt. Plus people are always looking for ways to improve grip on the Becker scales, so I wanted to make/try something that was cheap (uhhh free?) easy, and effective. Plus its an option that doesnt destroy the ergos of the handle or provide so much grip that it ends up being abrasive. I want to experiment with this more with some different materials like micarta/zytel etc. Also it might be cool to stonewash it, paint it, and then stonewash again for a sort of distressed look.
And here it is sans sheath. FYI regrinding the 2 was the best thing I have done for it... it cuts like a mora with its BK2 backbone. I have also battoned it with this geometry through knots with no edge damage. The geometry is really stable and cuts so well.
That is amazing! And you're less than $0.02 into that!!
I love the idea of modding the stock grips.
I've thought of stippling mine, but something always held me back...
Now I know what to do!!
")
- Joined
- Dec 3, 2010
- Messages
- 1,875
Thank you! Awww shucks!That's badass, you do great work!
Thanks! And as I put in the op, one of my "intents" was to make a way for anyone to add "gription" to their scales that was cheap, easy, and effective. Just takes the tiniest bit of elbow grease.That is amazing! And you're less than $0.02 into that!!
I love the idea of modding the stock grips.
I've thought of stippling mine, but something always held me back...
Now I know what to do!!
I have played around with stipling including different ways of toning it up or down, rubberizing, and all that, for a user blade that is in your bare hands constantly, it just doesn't work out for me. However, for a knife that would be used on a boat, over or underwater, or in super greasy environments it might be beneficial. For woods work or general work though, ergonomics and smoothness win every time for me. This mod though adds some grip without adding unnecessary "roughness" it's a smooth/soft/warm texture. To chop well with this knife I use a 2-3 finger grip holding onto the butt, this gription will just make that a more secure endeavor.
Also as a side note I would recommend using trimmed up gorilla/duct tape to protect the edges of the scales. Different rocks will probably produce different effects, you can buy tumbling media, or just walk outside
think sharp and abrasive. I would also recommend shaking for a short time (30 seconds or so) then checking your progress, (it's plastic and doesn't take much) then repeating until you find your desired level of damage. And above all else... try to have fun!