Crosscut Saw Thread

I've made several leaf spring underbuckers but my current pocket underbucker is made out of a 6 1/2" locking pliers. They have sealed roller bearings and fit into the side "plier" pocket of my work jeans. Cost for parts is about $5.
161860591.hLLxDKER.jpg


161860592.Y6mCaFuK.jpg


161860595.OB8E0gpH.jpg


163141530.TGsR6xcU.Z99A3304a.jpg


I usually pack a small piece of shoe leather if I have a wood or plastic handled axe. The leather provides and cushion and makes it easy to clamp the underbucker at an angle on the handle so the roller lines up with the saw.

More pics at: http://www.pbase.com/jimthode/pocket_underbucker

Jim

Thats darn nice Jim. I could make one of those in about 15 min, and send it with the trail crew. Mind if I give it a try?
 
I built this little pocket underbucker in my forge last year. I've not seen one quite like it, as far as how well it holds the axe handle.
I have been very happy with it, the few times I've used it so far.
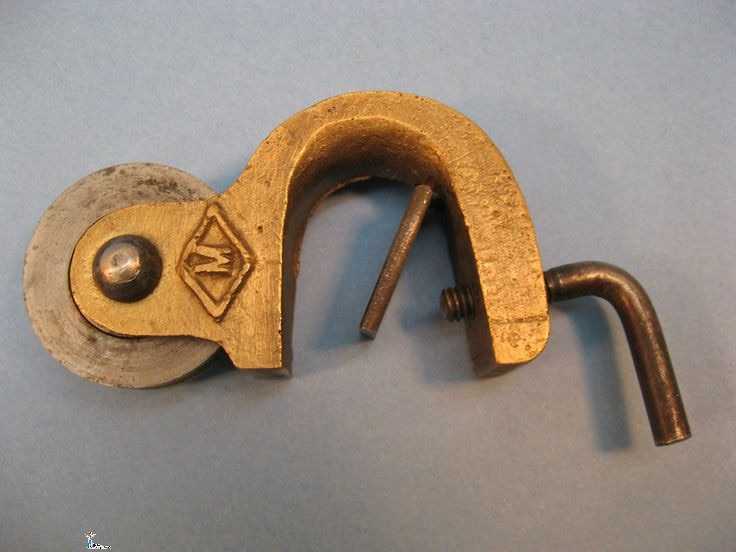
I like the handmade look of this one. Similar in operation to an unobtainable vintage one. Only may be a little larger and harder to place at an angle to line up the roller with the saw. Here is an original:
161860829.lmqkYBkO.underbucker3.JPG


Jim
 
I like the handmade look of this one. Similar in operation to an unobtainable vintage one. Only may be a little larger and harder to place at an angle to line up the roller with the saw. Here is an original:
161860829.lmqkYBkO.underbucker3.JPG


Jim


Youre right about the angle, and I saw that coming so I used a solid brass pully, with no groves. It allows for some wiggle room on the angle, but make starting a cut in the tool a little more trouble.
It seems to have worked out alright overall though.
Still think I'll copy the visegrip for our crew, if you don't mind. Be way easier to make!
 
Thats darn nice Jim. I could make one of those in about 15 min, and send it with the trail crew. Mind if I give it a try?
You are welcome to make one. When I make them I grind most of the sharp teeth off the inside of the jaws. Then I have a section of steel shaped similar to an axe handle, heat the jaws and form them around the steel section.

Jim
 
I've made several leaf spring underbuckers but my current pocket underbucker is made out of a 6 1/2" locking pliers. They have sealed roller bearings and fit into the side "plier" pocket of my work jeans. Cost for parts is about $5.


161860592.Y6mCaFuK.jpg


Jim
My compliments Jim. Creating something useful is one thing but to make it wonderfully simple such as you've done here is masterful.
 
Since this is a blade forum and heat treating is a big part of blades, this may be of interest.

Saw Hardness and Heat Treating

One of the main differences between a quality saw and a poor quality saw is the hardness of the steel. An economy saw is relatively soft and will not hold a cutting edge as long as a quality saw. In the day, manufactures went to great effort to make saws that would hold an edge as long as possible but could still be filed, set and swaged without any problems. Most vintage saws met that goal.

I was curious to see how saw steel would respond to normal tool steel heat treating operations so I jury rigged a Brinell hardness tester and did some testing. If the load on a hard ball, the diameter of the ball and the diameter of the dimple in the sample is known, the Brinell hardness number can be calculated. See the photo for details of my tester. I started with a section of crosscut saw and changed the hardness from the original condition to softer, to softer yet, to very hard and back to the original hardness again. I checked the Brinell hardness at each step and those results are indicated in the photos. The piece of saw I started with was cut off a serviceable saw and I would say it was about normal for a quality saw. That is, it filed fine and had no problems with setting or swaging the teeth. It was not too hard to sharpen and still held a cutting edge well.

I first checked the hardness of the original saw section. Then I tempered one area as may be done if a saw was too hard. The tempered area tested about 100 Brinell points softer then the original saw. The softer test was expected and it would follow that the softer metal would not hold a cutting edge as well as the original condition. What I do not know and have been interested in testing for is just how much of an effect the softer metal would have. Would the softer metal need sharpened twice as often? Would the saw wear out twice as fast? I don’t know, that is another test.


After I tempered the blade section I intended to harden again. Depending on the type of tool steel, quenching with air, oil, brine or water can be used to harden. Not know how the saw steel would behave I first tired to quench with a blast of air from an air hose. I heated to a cherry red and cooled as quickly as possible with the air blast. It did not harden and came out considerably softer. Since my test sample was larger then a single tooth, it is possible that a smaller single tooth could be quenched and hardened with a blast of air. I don’t know, I did not try it on a single tooth. I would call this stage of the sample as normalized. It was not as soft as a full anneal but softer then the previous step. The steel would have to be heated to a cherry red and cooled very very slowly to fully anneal it. I also tested another saw that has a section that I’d guess is fully annealed and it is about 175 Brinell points softer then this stage of the test section.

The next attempt at hardening was a water quench. That did the trick, it was harder then a file and it shattered during an attempted hardness test. I could cut it with a diamond hone but a file would not touch it.

The last step was tempering back to a condition that would be usable as a saw. This was tempered to about a blue color and that reduced the brittleness and increased the toughness. This left the steel about exactly as hard as the original saw. It could then be filed just as it could to begin with. With this sample I made a full circle, from normal hardness (735 BHM), to tempered softer (625 BHN), to normalized softer yet (476 BHN), to very hard (too brittle to test) and back to normal again (735 BHN).

So, what use could this be to saw filers? I can think of a few things. If a saw has been needlessly tempered to a soft condition or if a tooth has been replaced, the teeth could be re-hardened and tempered to a long lasting usable condition. If you have a saw like my “fire damaged” saw that is annealed dead soft in some teeth (see photos), it could be re-hardened and made to perform as new. Another possibility that is done with some competition saws is to set up a saw so it is just right and then heat treat so hard that you would maintain a razor sharp edge for many times longer then even a quality vintage saw. Some competition saws are hardened so hard that they can only be touched up with a diamond hone. If they need more work they have to be tempered/softened, reworked, re-hardened and then very slightly tempered to remove some of the brittleness. Wouldn’t be nice to have a trail saw that would last five or ten seasons rather then one season?


The bottom line for crosscut saw filers is that for most saws there should be no need to do any heat treating. On rare occasions a saw will be found that is too hard and they can be tempered some to help out. On even rarer conditions where saw teeth need to be hardened or completely re-heat treated, that is possible too.

167263409.KKidk8Em.Z99A2067a.jpg


167263405.FbFqBfFV.Z99A2053a.jpg


167263406.N6BuKvr9.Z99A2061a2.jpg


167263407.rVMtNy2L.Z99A2063a.jpg


167263408.Uf991htB.Z99A2065a.jpg


167263410.6ZrNrpRB.Z99A2069a2.jpg


167263412.XDFXiYdX.Z99A2083a.jpg


167263411.MiUB1afq.Z99A2075a.jpg


Jim
 
Great post Jim.
I have tempered a few saws back that showed signs of being to hard, but never attempted to reharden and temper any that were soft.
I have made a few knives out of broken saw pieces, and heat treated them with good success. Nothing scientific like your test.
Valuable information you presented.
 
Thank you,Jim.Muleman77 said it all,it Is most valuable information.
It is in a format of "don't try this at home",but very,very good.

Btw,in that excellent USFS manual about saw maintenance there may be a mistake in description of order tempering colors in the part about swaging rakers....
 
Thank you,Jim.Muleman77 said it all,it Is most valuable information.
It is in a format of "don't try this at home",but very,very good.

Btw,in that excellent USFS manual about saw maintenance there may be a mistake in description of order tempering colors in the part about swaging rakers....
I never noticed it but I would agree the temper colors in the manual are not quite correct.
The manual states,
"To temper the raker, polish one side of each raker until it is
shiny. Place the saw in a vise. Heat the top three-fourths of
the tooth uniformly using a propane torch. As it gets hotter, the
color will go from light straw to brown, to deep purple, to dark
blue, to light blue, to a light yellow color. Opinions differ on
how far to temper the rakers (or to heat them to what color).
A compromise seems to be between light blue and the second
yellow. A suggestion would be to first temper to light blue and
if trouble is still experienced, temper again to the second light
yellow. Don’t heat into the body of the saw because it may
cause the saw to warp. Be very careful about playing the torch
flame on the raker tips—they heat very fast, making them
extremely easy to overheat. The result is a soft raker that will
bend in hardwood and will not hold an edge."
There should not be a second yellow. Most references go from blue to light blue to gray blue to gray green or just gray.

2e7bc46e562923cf0141095cc850ecc2.jpg


Jim
 
Yes,Jim,thank you.Once you're seeing the blues your tempering must stop fairly soon,and that Light Blue to Gray is pretty much the end.
So getting close to there is a bit hairy.

I'm sure that it was just an editing glitch.

Reading about it made me want to mess with my saw a little(where that half of the raker is broken the grain looks too large,as in individual grains are visible ),but i'll probably cut a dummy shape out of similar thickness mild to practice on first,your torch will have to be pretty steady,and not wag about at all,hitting the cutters near by,or overheating the tips.

And of course yours is a most wise idea of cutting off some of the end tabs to practice the HT on.

I've not the luxury of being able to dedicate the time to it at present,however it's very appealing to really have a handle on your tools,inasmuch as adjusting hardness,and practicing correct swaging and sharpening.
 
Here are some photos from today's sawyer certification class. It's a Forest Service approved course that allows you to buck with either a chainsaw or crosscut saw on any Forest Service land across the USA. The Back Country Horsemen of Washington (BCHW) were the first group be allowed run such a certification program.

First some posters I thought you guys would like to see.
DSCN2205_1024x768-1.jpg

DSCN2206_1024x768-1.jpg

DSCN2209_768x1024-1.jpg

DSCN2210_1280x960-1.jpg


There was a classroom portion (3 hours) plus a outdoor portion, another 3.5 hours. These photos are from the crosscut saw training portion of the class. We're over dressed for the work because we had to wear proper PPE for the chainsaw portion of the class which we had just completed. Here a new sawyer is bucking a top bind with my 48" lance tooth. The wedge is keeping the kerf open and preventing bind.
DSCN2211_1024x768.JPG


Here a sawyer is preparing to underbuck a top bind with my pocket underbuck and my Walters axe with the knob-end handle.
DSCN2214_1024x768.JPG

Everyone who picked up that axe immediately fell in love with it. As non-axe-afficionados they didn't know exactly why, just that it felt great. That was very satisfying for me. That haft really is a dream in hand.

Close up of the underbuck.
DSCN2214-1.jpg

That two-man crosscut is one that one of the instructors brought it. It was freshly sharpened razor sharp and cut like a dream!

Here's a team of sawyers practicing a double buck on a small windfall.
DSCN2216_1024x768.JPG


All in all the class was well worth taking. Lots of good info and tips from some real pros. Plus it was just a fun time with a bunch of folks who share our fascination with crosscut saws and axes.
 
Looks like a nice day S Square_peg .
BCHA is really picking up their game with the sawing here in CA as well.

I work with them as volunteers a ton, packing trails. We always had a couple of their folks take the agency course here we put on, but now they've taken it from there, are providing training and really pushed a lot of their folks to get a cert.

Anyway, looks like a good day!
 
How to tell if a handsaw's handle has been retrofitted: step 1.

7InWXFi.jpg

it actually does have an etch but it's too faint and definitely not a disston

it's a little bit of scroll work :
4rsvavM.jpg
 
Back
Top