Mod'ing The CS Trail Hawk

After seeing the great video about the trailhawk by IA Woodsman, then finding this thread, I got a CS Trailhawk and attempted my own mods.

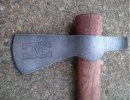
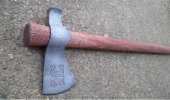
Stripped the paint and smoothed the head a little. Attempted an etch, which didn't turn out quite as good as I hoped. I may have left it in the etchant too long. Put a vinegar patina on it. Sanded and stained the handle.

My initials are DC, so I tried to make interlocking horseshoes look like my initials

That was a fun and cheap project. I can see how it may become addicting. Next step is to get it out in the woods and play with it!

For better or worse, here it is:
attachment.php
 

Attachments

  • th1.jpg
    th1.jpg
    82.5 KB · Views: 1,616
  • th2.jpg
    th2.jpg
    42.7 KB · Views: 101
Last edited:
Okay...here's what I've done so far...
I was only able to get one pass on the paint stripper because the can I bought malfunctioned. I pressed it once and it stayed pressed in; I couldn't get it to stop. I pulled so hard the tip came off and it was spewing out. I had to throw the can out in the woods..

Good stuff man (except the stripper can out in the woods :eek:).

I like the homemade handle what sort of wood is that?
 
Steve Holt I think that etch looks cool. How long was it in the etchant?

Thanks

about 10 hours

It didn't etch real deep, but it didn't get very clean edges. Also, it's real obvious where the hardening line is. It seems that that hardened part near the bit was where I had the problem.
 
about 10 hours. It didn't etch real deep, but it didn't get very clean edges. Also, it's real obvious where the hardening line is. It seems that that hardened part near the bit was where I had the problem.

Yeah I only do 2-4 hours total, with rinses every hour or so. I've had the same issue with the hardening line and plan to keep the etching away from it in the future.
 
Good stuff man (except the stripper can out in the woods :eek:).

I like the homemade handle what sort of wood is that?

I went out and got the stripper can the next day. I used white ash for the 15" handle which was a pain to work with (took an hour to get right). I tried again and made a second handle with hickory that's about 25" long and it was much easier to make (Hickory is a great wood to work with though). It took about 20 minutes which wasn't as good as iawoodsman's video, but I'm still practicing. I'll post some pics tomorrow of it.

One observation I have made from making those handles is that just taking the head and making a handle at the campsite is an extremely plausible situation. This would make sense on tight weight requirements but you absolutely MUST practice this because my first go-round had me tired and annoyed; the second time seemed much easier. Or maybe it was my wood choice.
 
Last edited:
I think IAwoodsman used green wood to make his handle, which made it easier to work.

I didn't think of that but it makes sense. The ash was taken off a fallen limb while the hickory was a fresh sapling. That may have made all the difference.
 
Here are pics of my 25" handle... It almost looks better to me than the stock one. No one should have to pay $10 for a stick.


It's fit isn't perfect, but the way the head wedges in there makes it extremely secure...


Pretty awesome when the handle is long. What's weird is that it actually feels good in the hand and works great for two handed swings.


Next up is a full-size 35" handle. Dangerous? Maybe. Fun? Absolutely.
 
Drummertist, nice work on the handle. I'd like to make a shorter handle for my Frontier hawk, but I don't want to pay $9 plus shipping. Maybe I can find a piece of oak that will work.
 
Been a while since I worked on a hawk, but I got my hands on a CS pipehawk and decided to try few mods...

Started out with some reshaping, by rounding off the sharp angles near the haft and pipe area. Stripped the paint (that paint remover is some nasty stuff!) sanded it, ...then dicide to try my hand at some etching, (thanks to Pullrich and others for the helpful etching info!)

I decided to leave a lot of the pitting since I'm going for the "functional antique" kind of look. I'm doing an old style vine pattern theme with my initial "F" thrown in there. The vine pattern took about 12 hrs, while the F didn't take the first time, so I had to re-do it with another 12 hrs of rinse and soke....
014.jpg


Did some vine pattern filework on the top, and a gun blue patina...
016-2.jpg


A before and after so you can see where I reshaped it. Also I purposely used the etchant to cause pitting on the areas I filed down to create a more uniformed old-timey look...
018-1.jpg

019-2.jpg


Sticking with the vine theme I burned this pattern into the haft, stained it, and put some brass tacks in the top and bottom. I also filed out the screw hole into this star pattern (thanks to hawkhead for that idea) ...then filled it with a liquid steel type epoxy. Sadly I should have done that after the etching since the etchant caused some unwanted discoloring...
022.jpg


Messed around with some cord wrapping, but I'm not happy with it yet, so it will get redone soon. OH and I gave it a good hair shaving convex edge, cause you never know when you may need to scalp someone. :)
021-1.jpg

....and a pic of the sheath and belt loop, courtesy of Goose52....
023.jpg


Thanks for looking, this was a fun learning experience! I think my next hawk will be better now that I've figured a few things out. :)
 
omg that is beautiful! i need to learn to do etching, is it hard? can it be done with like a dremel?
 
Last edited:
omg that is beautiful! i need to learn to do etching, is it hard? can it be done with like a dremel?

Hey thanks!

The etching is done with a liquid, PBC etchant, that can be picked up at any Radio Shack. If you go back a ways in this thread there is a good how-to by Pullrich with some tips thrown in by other guys. :thumbup:

I wouldn't say it's super easy, takes a bit of time and patience but it's not that bad. This was my first time, and from what I've learned I think I could do it better and faster next time. :)

I got some of that etchant stuff but I'm afraid to put it on my precious blade. If the etch messes up it will be permanent. Decisions decisions.
 
I got some of that etchant stuff but I'm afraid to put it on my precious blade. If the etch messes up it will be permanent. Decisions decisions.

I would suggest getting somthing cheep and non-stainless to practice on then. See how you like it before trying it on a blade you really care about. :)
 
Bryfry that's a beauty, one of the top on this thread so far. Fancy but tasteful. That is a SERIOUSLY deep etch, and clean, well done. 12 hours you say? Wow What did you use for a resist?
 
Back
Top