It is finished! 

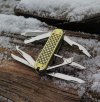
Now behold the Alox MoneyChamp:

74mm closed. 5 layers. 12 tools. Lanyard ring and clip.

Side shot. Thicc boi.
From top to bottom: spoon gouge, scissors, parcel hook, small nail file paired with a regular knife, orange peeler.

Other side. 2 seksi.
From bottom to top: cut and picker, small knife paired with regular knife, magnetic phillips combo tool, awl with sewing eye, long nail file.

The spoon gouge was made by sharpening the tip of a cuticle pusher tool from a Minichamp. Spoon gouges are type of chisel for carving out rounded indentations which are useful for making things such as spoons and bowls.
My first attempt at modifying the cuticle pusher into a spoon gouge ended with mixed results. The chisel worked well, but I had already removed way too much of the spoon while forming the chisel edge. I was much more careful with my second attempt, and this gouge works well enough while still having plenty of material left in the tip for future sharpenings.

The long nail file has a more aggressive single cut pattern which is only found on the Executive models which were manufactured in the last few years. This latest single cut file patern is much more useful on materials like wood or plastic. That is why it made sense to include two different nail files. Both files have their own different uses. Likewise, the included orange peeler and "cut and picker" tools are both similar in function while having different uses. The orange peeler is an excellent light duty pry tool and cardboard box opener, while the cut and picker tool is better for opening small clam shell packages.
Several of the tools came from the 58mm and 91mm ranges, and so the tools had to be modified to work properly in a 74mm size SAK. In a few cases the pivot holes of the smaller tools also had to be enlarged from 1.5mm to a 2mm diameter.
I had previously seen other modders resort to using cobalt bits to enlarge pivot holes in SAK tools, but it turns out that you don't need any special cobalt drill bits to perform this task if you are only doing it by hand. I was able to do the job without any power tools through the use of sandpaper and hand drilling. Regular cheap hex drill bits were used in conjunction with nothing but a standard 1/4" hex bit screwdriver. I should note here that I did still manage to break two different 5/64" bits, but I didn't care since they were both cheap bits anyway.
I also want to share something else that I found interesting: I actually generated sparks at several points while drilling by hand, which was a pleasant shock and very entertaining. I theorize that the sparks may have something to do with the amount of pressure that the drill bit was under. Even though the bit was difficult to turn and was moving very slowly, it was making a lot of high pitched scrape and squeak noises.
edit:
There were some things I didn't like about the first build of this SAK, so I tore the whole thing apart and rebuilt it.
Here's what's different now:
1. The top two layers have been spaced farther apart. They were functioning fine before, but I didn't like the aesthetics of those two layers being so closely fitted to each other.
2. The brass washers that I was using as spacers for some of the tools have been replaced by stainless steel washers. Brass is soft and I was worried about the thin washers possibly being destroyed by dust and grit. The stainless washers should be a lot more durable in theory.
3. The short finger nail file was replaced by another small secondary knife blade. The small file wasn't aggressive enough for me. I'll get more use from an extra blade. Edges get dull and can't always be sharpened right away, so having another knife is always welcome.
That's basically it.

There's now an extra liner between the top layer and the layer underneath. This provides some space between the cut and picker and the secondary knife on one side...

...and between the spoon gouge and the scissors on the other side.
The old brass washers were made by sanding down a few bushings to the required thicknesses. It was quick and easy to make them.
The new stainless steel washers were purchased as 2mm inner diameter washers and were subsequently modified. I used a file to decrease their outer diameter so that they would fit, and then I sanded each one to reduce their thicknesses by the necessary amounts. It took a lot longer to modify the stainless steel washers than it took to make the brass washers, but I think it was probably worth spending that extra time.
edit again: front logo shot

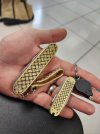
...the other multitool was an experiment with custom Leatherman Juice building.
Now behold the Alox MoneyChamp:

74mm closed. 5 layers. 12 tools. Lanyard ring and clip.

Side shot. Thicc boi.
From top to bottom: spoon gouge, scissors, parcel hook, small nail file paired with a regular knife, orange peeler.

Other side. 2 seksi.
From bottom to top: cut and picker, small knife paired with regular knife, magnetic phillips combo tool, awl with sewing eye, long nail file.

The spoon gouge was made by sharpening the tip of a cuticle pusher tool from a Minichamp. Spoon gouges are type of chisel for carving out rounded indentations which are useful for making things such as spoons and bowls.
My first attempt at modifying the cuticle pusher into a spoon gouge ended with mixed results. The chisel worked well, but I had already removed way too much of the spoon while forming the chisel edge. I was much more careful with my second attempt, and this gouge works well enough while still having plenty of material left in the tip for future sharpenings.

The long nail file has a more aggressive single cut pattern which is only found on the Executive models which were manufactured in the last few years. This latest single cut file patern is much more useful on materials like wood or plastic. That is why it made sense to include two different nail files. Both files have their own different uses. Likewise, the included orange peeler and "cut and picker" tools are both similar in function while having different uses. The orange peeler is an excellent light duty pry tool and cardboard box opener, while the cut and picker tool is better for opening small clam shell packages.
Several of the tools came from the 58mm and 91mm ranges, and so the tools had to be modified to work properly in a 74mm size SAK. In a few cases the pivot holes of the smaller tools also had to be enlarged from 1.5mm to a 2mm diameter.
I had previously seen other modders resort to using cobalt bits to enlarge pivot holes in SAK tools, but it turns out that you don't need any special cobalt drill bits to perform this task if you are only doing it by hand. I was able to do the job without any power tools through the use of sandpaper and hand drilling. Regular cheap hex drill bits were used in conjunction with nothing but a standard 1/4" hex bit screwdriver. I should note here that I did still manage to break two different 5/64" bits, but I didn't care since they were both cheap bits anyway.
I also want to share something else that I found interesting: I actually generated sparks at several points while drilling by hand, which was a pleasant shock and very entertaining. I theorize that the sparks may have something to do with the amount of pressure that the drill bit was under. Even though the bit was difficult to turn and was moving very slowly, it was making a lot of high pitched scrape and squeak noises.
edit:
There were some things I didn't like about the first build of this SAK, so I tore the whole thing apart and rebuilt it.
Here's what's different now:
1. The top two layers have been spaced farther apart. They were functioning fine before, but I didn't like the aesthetics of those two layers being so closely fitted to each other.
2. The brass washers that I was using as spacers for some of the tools have been replaced by stainless steel washers. Brass is soft and I was worried about the thin washers possibly being destroyed by dust and grit. The stainless washers should be a lot more durable in theory.
3. The short finger nail file was replaced by another small secondary knife blade. The small file wasn't aggressive enough for me. I'll get more use from an extra blade. Edges get dull and can't always be sharpened right away, so having another knife is always welcome.
That's basically it.

There's now an extra liner between the top layer and the layer underneath. This provides some space between the cut and picker and the secondary knife on one side...

...and between the spoon gouge and the scissors on the other side.
The old brass washers were made by sanding down a few bushings to the required thicknesses. It was quick and easy to make them.
The new stainless steel washers were purchased as 2mm inner diameter washers and were subsequently modified. I used a file to decrease their outer diameter so that they would fit, and then I sanded each one to reduce their thicknesses by the necessary amounts. It took a lot longer to modify the stainless steel washers than it took to make the brass washers, but I think it was probably worth spending that extra time.
edit again: front logo shot

...the other multitool was an experiment with custom Leatherman Juice building.
Last edited:


