• The BladeForums.com 2024 Traditional Knife is ready to order! See this thread for details: https://www.bladeforums.com/threads/bladeforums-2024-traditional-knife.2003187/
    Price is $300 $250 ea (shipped within CONUS). If you live outside the US, I will contact you after your order for extra shipping charges.
    Order here: https://www.bladeforums.com/help/2024-traditional/ - Order as many as you like, we have plenty.

  • Today marks the 24th anniversary of 9/11. I pray that this nation does not forget the loss of lives from this horrible event. Yesterday conservative commentator Charlie Kirk was murdered, and I worry about what is to come. Please love one another and your family in these trying times - Spark

Whacha Been Up To......

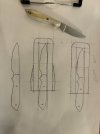
Making up a replacement sheath for this little caper. I am planning on making it a sandwich style instead of the old taco style it already has. I am trying to decide between a double welted like on the right, or a top flared one on the left. I am leaning towards doing flared sheath since I haven’t tried that style to account for the handles girth before. Should I flare the welt at the top too?
Thoughts from you sages?

IMG_0348.jpeg
 
Making up a replacement sheath for this little caper. I am planning on making it a sandwich style instead of the old taco style it already has. I am trying to decide between a double welted like on the right, or a top flared one on the left. I am leaning towards doing flared sheath since I haven’t tried that style to account for the handles girth before. Should I flare the welt at the top too?
Thoughts from you sages?


View attachment 2923921

I'm always curious how people prevent the bowing/buckling that happens with this style of sheath toward the top (unless the handle is skinny).
 
I'm always curious how people prevent the bowing/buckling that happens with this style of sheath toward the top (unless the handle is skinny).
On a previous sheath, I added a thin secondary welt at the top. It seemed to work, but after wet forming, it was loose. I managed to snug it back up with a second line of stitching, the sheath now works perfectly!

IMG_0308.jpeg
 
two of mine are double row and they are killers!
Not only looks good, but adds more structure to the sheath and a little extra safety.
So easy with a sewing machine tho... 🤣
 
Thanks! It’s #92 T90 thread. I have been wondering if my machine could support thread a little thicker not because this isn’t strong enough, but I think thicker looks better and more like hand stitched jobs.
I think size 138 would be more standard for a belt if your machine would do it. It does give a project a more robust look while being a size that many lighter machines can handle.
 
a few sheaths just about ready for hot packing
ZAPKe9a.jpg
 
Finished my little pocket wheat for my caper. I think I used too thin of veg tan since it didn’t form a hard surface when I wet formed it. I may have to put some more stitches on to snug up the retention, but I learned a good deal with this sheath, so there’s that.

View attachment 2925881

It works!!👌....And you educated yourself!!!! ..

I. Call that. SUCCESS....😉........👍👍👍
 
Finished my little pocket wheat for my caper. I think I used too thin of veg tan since it didn’t form a hard surface when I wet formed it. I may have to put some more stitches on to snug up the retention, but I learned a good deal with this sheath, so there’s that.

View attachment 2925881
Baking at a low temp (178) after wet molding will firm it up.

All you hand sewers jinxed me. Had to do some hand sewing for the first time in maybe a decade, yesterday. Was repairing a stitch line on a wear leather on a saddle pad. A few stitches had come loose on the front opf the wear leather. This saddle pad is 3/8’ of wool fleece and then 3/4” of a very dense wool felt with a gel pad layer sandwiched in between. The presser foot on a Cobra 4 will lift and sew 7/8” I’ve actually sewn things bigger than that so I was trying. However I forgot to mention that the wear leather itself is probably 7/8oz. I just couldn’t squeeze it under. The pad by itself would go, add the wear leather and nope. So I dug around found a couple of needles and grabbed some 277 thread and found my awl. It was still tricky and took four hands and a pair of needle nose pliers but we got er done.
 
a few sheaths just about ready for hot packing
ZAPKe9a.jpg

Horsewright Horsewright , how are you and Lorien here getting such round edges. Are you double beveling? Or maybe using a fat gauge round beveler with the divot in it?

I need rounder edges in my life. I try and shape the edges with my burnishing tool (after beveling and still wet), and while it does round down the sharp angles left from my flat beveler... the overall shape isn't as round as I'd like.

Instead of buying a belt sander which I badly need, I've got a burnishing machine on the way that has a drum sander and is fairly quiet... so I can emulate a part* of your rounding technique... but damnit if I haven't gone through a half dozen bevelers trying to achieve a version of what you both do so well.
 
Baking at a low temp (178) after wet molding will firm it up.

All you hand sewers jinxed me. Had to do some hand sewing for the first time in maybe a decade, yesterday. Was repairing a stitch line on a wear leather on a saddle pad. A few stitches had come loose on the front opf the wear leather. This saddle pad is 3/8’ of wool fleece and then 3/4” of a very dense wool felt with a gel pad layer sandwiched in between. The presser foot on a Cobra 4 will lift and sew 7/8” I’ve actually sewn things bigger than that so I was trying. However I forgot to mention that the wear leather itself is probably 7/8oz. I just couldn’t squeeze it under. The pad by itself would go, add the wear leather and nope. So I dug around found a couple of needles and grabbed some 277 thread and found my awl. It was still tricky and took four hands and a pair of needle nose pliers but we got er done.
Thank you for the tip! I did not know that.
 
Horsewright Horsewright , how are you and Lorien here getting such round edges. Are you double beveling? Or maybe using a fat gauge round beveler with the divot in it?

I need rounder edges in my life. I try and shape the edges with my burnishing tool (after beveling and still wet), and while it does round down the sharp angles left from my flat beveler... the overall shape isn't as round as I'd like.

Instead of buying a belt sander which I badly need, I've got a burnishing machine on the way that has a drum sander and is fairly quiet... so I can emulate a part* of your rounding technique... but damnit if I haven't gone through a half dozen bevelers trying to achieve a version of what you both do so well.
I use my 2x72. Been liking zirconium for leather, due to the sharpness of the grit. I only use coated abrasives.
There's a lot of burnishing happening apres sanding as well.
 
Back
Top