What's going on in your shop? Show us whats going on, and talk a bit about your work!

Hoping to have a few more of THESE done befor the end of the month.

16759397669_a4333b44e5_z.jpg


16979206845_3db32fa693_z.jpg


16954252816_6fb1538fea_z.jpg


Erin
 
Very nice looking knives. I like the spine treatment. A WIP thread would be nice to see if you ever had the time.
 
Last edited:
Dude that looks sooooo awesome! I ordered some jade G10 not long ago with the same type of thing in mind. Very nice job man!!!!

Thanks man! I appreciate the compliments. It turned out better than I could have expected. It looks like it almost glows. I'm excited to get a couple more liner colors and experiment with it.
 
Grinding some M4 Really thin for a Nakiri that I'm making for a chef. It's .010in about .25in from the zero edge. If I would have listen to everyone on here about how hard M4 is to grind my finger would still have feeling. This stuff is pretty amazing tho. Its at a 63-64hrc and holds an edge like no other...
 
Just finished another mini cleaver.
3/16" 1075 a little more than edge quenched.
Almost a full flat grind
6.5" OAL
3-3/8" blade
Damascus bolsters stainless pins and corby
Black linen micarta with blue g10 liners
A3989704-1F2D-4D85-BF41-1E86ECB889CF_zpsafk7mdhr.jpg

Close up of damascus before finish sanded
0DFF9E90-2BCE-4D88-91C5-59AF20C7C22D_zpsi5tb5put.jpg
 
Mob, Cool tracking knob! These are good mods to make. You should now try a gas piston to replace the stock spring. You can order one from McMaster Carr . Try a 30 lb . Here is a photo of mine. It works a lot better than the stock spring in my opinion. Larry
ghDPcl6l.jpg
 
Thanks Larry,

I thought about the gas strut, but right now the factory spring works just fine. More or less I'd probably replace it, just for the sake of modding the grinder, sure is fun making it my own. :D
 
I finally got setup enough to start grinding some blades. Here is my first ever custom blade. I did the 'half full tang' to try to get a couple practice blades from my bar stock since they may just end up being trashed while I learn to grind. I think it came out OK for my first try. I left the edge area thickness at about .025-.030....I over shot my center when trying to get a uniform flat grind & ended up having to just put the edge on the grinder & make the blade narrower to get it thick enough for possible heat treat. I think I like it better this way, as it was almost the full 1.25" wide before. The tang will be shortened & I'll figure out my handle size & hole placement next. The lower portion below the tang will be filled with 1/8" G10 which matches the blade thickness.


Picked up a rubber horse stall mat from my local tractor supply for $38 & like enough that I'll get one more for my work area. I have dropped a knife twice & buggered up the end, I'm hoping this will give me a little protection from drops, also, with my bad knee & flat feet, I'm hoping this will make it a little easier on my joints when i have to stand at the grinder or drill press. I'm also going to cut a strip off of one of these & see how they work for scales; I saw someone selling them but the price was high considering you can get a 4'x6' mat for around $40.


I also finally fired up my brand new Miller mig welder that I bought back in 2007 to build a 34 International Harvester truck rat rod project that I ended up selling to fund a new home purchase. I haven't welded with a mig before & haven't stick welded since the early 90's, so excuse my sloppy welds, lol. So, here's my first project, a knife vise. I made my knobs from all thread, a connector nut, and rod. Finish is Rustoleum hammer finish. I originally planned on having it mount on the top of my workbench, but it put the blade too high for me to comfortably work on it, so I came up with this idea of just drilling & having it go thru my bench frame. The t-bolt on the back allows me to easily spin the vise 360 degrees. I may route a j-slot from the bottom of the bench so I can easily loosen the t-bolt & drop the vise out instead of unscrewing it all the way, as I made the t-bolt long in case I need to install it on something thicker in the future.


I made a couple custom corby bolts for profiling scales before epoxy. I just ground them down & used one of the thin stone type cutoff wheels on my dremel to make another flat head slot. Here's a before & after comparison. This will allow me to almost completely finish scales before epoxy.

 
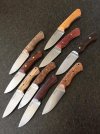
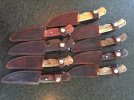
Just finished up this batch of hunters in 1084 for my son and his friends. I'm taking them backpacking this summer and I'm going to surprise each of them with a knife. I used Osage Orange, East Indian Rosewood, Cocobolo, Black Ash Burl, Sheoak Rays, Hawaiian Silky Oak, Oak Burl, Kingwood and Spalted Tamarind. ImageUploadedByTapatalk1428287589.941174.jpgImageUploadedByTapatalk1428287615.841932.jpg
 
Just finished up this batch of hunters in 1084 for my son and his friends. I'm taking them backpacking this summer and I'm going to surprise each of them with a knife. I used Osage Orange, East Indian Rosewood, Cocobolo, Black Ash Burl, Sheoak Rays, Hawaiian Silky Oak, Oak Burl, Kingwood and Spalted Tamarind. View attachment 531612View attachment 531613

WOW! what a surprise!! great looking knives! They'll love'em
 
7.5 overall. 4 inch blade. CPM-154 @ 61. Natural g10 over blue liners with black micarta pins. First time working with g10 on a belt grinder and WOW is it so much easier than micarta. Doesn't burn near as easy, grinds easier, and doesn't clog the belts. Loving the natural over a liner, definitely going to be exploring this more in depth.


What is natural G10? The first time I used G10 on a grinder I found it soo much harder than micarta... wondering what is so different about natural G10...
 
A couple in the works getting wrapped and impregnated

rePHoMX.jpg


Z18XXrq.jpg


yzacsIZ.jpg
 
Made a bit mor progress on the little guys.

This photo shows the fitting of one of the wood inserts.

16837832409_0381975c17_z.jpg


Erin
 
Made a bit mor progress on the little guys.

This photo shows the fitting of one of the wood inserts.

16837832409_0381975c17_z.jpg


Erin

That's really cool. How are those wood inserts retained in the tang? pinned vertically?

Looked again and maybe you'll be cord wrapping over these?
Thanks,
Darcy:)
 
Darcy… it's a tight press-fit that ends up secured under an epoxied 550-cord tsukamaki wrap.
Erin
 
Back
Top