- Joined
- Jun 29, 2011
- Messages
- 750
The BladeForums.com 2024 Traditional Knife is available! Price is $250 ea (shipped within CONUS).
Order here: https://www.bladeforums.com/help/2024-traditional/
America has reached 250 years, and I am grateful to be here, in the best country in the world. Thank every one of you who helps make this country a better place, those who have gone before and risked it all, and those who've paid the ultimate price to make the United States what we are today.
Happy Birthday America! Let Freedom Ring for all time!
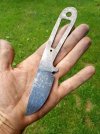
Ahh makes sense for sure!! The swooping plunge works really well if you twist the blade as you approach the choil (try it on some scrap steel to see what I mean)thanks man! I've been wanting to figure out how to do a plunge like this for a long time and somehow it seemed to work out today. I spilled my coffee this morning and broke my cup, so maybe that had something to do with it
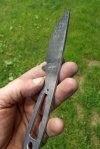
I wanted to keep this blade full thickness along its length to minimize the chance of warping during the quench. So what I'm planning on doing is continuing the primary bevel through the swedge once it's heat treated, with the top of the bevel being about in line with the tip. The stock thickness should taper a lot where the two bevels meet so even though the grind line won't be too high up the geometry should be fairly acute toward the tip

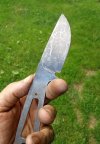
Where do you get your K390 from?Cleaned up this profile a bit, and think I'll just leave it like this on the flats. It's K390 at 66+ Hrc

Yeah they don’t ship to the USA

the learning curve for developing some sensitivity with the grinder has been steep!Ahh makes sense for sure!! The swooping plunge works really well if you twist the blade as you approach the choil (try it on some scrap steel to see what I mean)
Idk about in Europe, but check amazon if you haven't alreadyBeen looking for some 1200grit silicon carbide powder in Europe to try on my hamon process, anyone knows a European source?


Looks good! The best success I had with nail nicks pre-mill was to pick a design that didn't need nail nicksMy first slip joint folder. This was quite the learning experience. I used a scrap piece of A2 for the blade and spring. My original plan was to only put jade green scales on it, but I ended up having to use some of my nickel silver for bolsters because I drilled a pivot hole in the wrong place. Any advice on adding nail nicks without a mill would be greatly appreciated.

. Seriously though, I had good success making long pulls with a dremel cutoff wheel in a drill press with a junky cross slide vise. It turned out much better than I expected. I used a dressed dremel cutoff wheel and files/paper to do traditional nail nicks, but only got so good at it. Certainly functional, but it eventually became the weak aesthetic point of my work. I tried using punches, but never got that quite right. I found it hard to get the depth needed without overly chipping the punch. Then I got a mill... I still use my punch to crisp up corners off the mill. I never tried it, but it would be intriguing to use a dremel/files to get the depth and shape needed, and then use the punch to crisp up the corners. Nail nicks were the bane of my existence for several months at the beginning of the year.


Wow that thing is freaking cute!This little guy came by the shop today to say hello.