-
The BladeForums.com 2024 Traditional Knife is available! Price is $250 ea (shipped within CONUS).
Order here: https://www.bladeforums.com/help/2024-traditional/
You are using an out of date browser. It may not display this or other websites correctly.
You should upgrade or use an alternative browser.
You should upgrade or use an alternative browser.
Beckerhead Knife Making and Modification Thread
- Thread starter granitestateofmind
- Start date
- Joined
- Dec 9, 2013
- Messages
- 3,159
LOL!!!! You had me going. I was watching and thinking, "How on earth is he hitting the same spot every time moving that fast?!?!?!"
Got anything places to go look for how to really do it with a belt grinder or is it all about the jig and a nice hand filing?
FWIW - the camera makes nice videos.
Got anything places to go look for how to really do it with a belt grinder or is it all about the jig and a nice hand filing?
FWIW - the camera makes nice videos.
Last edited:
- Joined
- Sep 30, 2012
- Messages
- 15,381
LOL!!!! You had me going. I was watching and thinking, "How on earth is he hitting the same spot every time moving that fast?!?!?!"
FWIW - the camera makes nice videos.

I didnt have any tips for real other than practicing, but thought id get laugh out of this, and maybe some others will too LOL
I have gotten a little better keeping my bevel lines straight with the 2X42.. By just practicing. I cut out a few of those dagger shaped blades to give me more practice per piece of steel since both edges are being ground on both sides. But the little hex hawks have been keeping me busy so up until today i wasnt able to get much practice time in.. While they are at heat treat ill be doing more practicing though. I would save MANY HOURS of filing if i could get the hang of this machine.
And yea bud, im pretty happy with the camera!! It performs pretty well. My old one made the videos a bit more "shaky" especially when i was holding the camera. Sometimes id have to use youtube to stabilize it... But this one was done without any editing and even when holding the camera and moving around it seems to capture a decent video. Plus it sends the video (pictures too) to my computer via wifi, so no more connecting the camera or removing the memory card and putting it in the computer to download it to my computer. Its a great camera for the price IMO. The only fault i can find is battery life is not quite as good when using the wifi feature, but thats to be expected i guess.
- Joined
- Aug 13, 2008
- Messages
- 1,277
I have watched the Nick Wheeler video series, other professional knife makers videos and received advice from the pros on the forum. Patience, practice, planning, good equipment and taking your time will get you good results. Plunge lines tweak by hand add a precise look.


- Joined
- Apr 20, 2013
- Messages
- 7,205
That is looking sweet, hawk.....but be careful that you don't show it to any Spyderco lawyers ") .
.
.- Joined
- Apr 20, 2013
- Messages
- 7,205
Finished up a little leather work for the belt carry portion of the 7's sheath. I love going to Michael's Crafts store on Friday nights. The scenery is just...very satisfying.

Retention is a little too serious...pretty sure it's the choil area; trying to figure out a remedy without screwing up the basically good snap around the lower guard.
Back side:

I don't really plan to belt carry it, though...made a first attempt at slots for MOLLE type straps for "tactical" carry.

Feels really good in my hand, and I quite miraculously got an excellent edge onto it. Plus the tactical ass end beer opener works....like a beer opener should.

The sharp end works pretty good, too....

Retention is a little too serious...pretty sure it's the choil area; trying to figure out a remedy without screwing up the basically good snap around the lower guard.
Back side:
I don't really plan to belt carry it, though...made a first attempt at slots for MOLLE type straps for "tactical" carry
.
Feels really good in my hand, and I quite miraculously got an excellent edge onto it. Plus the tactical ass end beer opener works....like a beer opener should.
The sharp end works pretty good, too....
- Joined
- Sep 30, 2012
- Messages
- 15,381
Looking great Mike!! Very nice sheath work!
Now that those little hawks are gone to heat treat i have some time to play!! I got the handles rough cut, holes drilled, dimples drilled, cleaned up, and epoxied. More to come once the epoxy is cured. Using Madagascar ebony on this one.
Now that those little hawks are gone to heat treat i have some time to play!! I got the handles rough cut, holes drilled, dimples drilled, cleaned up, and epoxied. More to come once the epoxy is cured. Using Madagascar ebony on this one.
- Joined
- Sep 30, 2012
- Messages
- 15,381
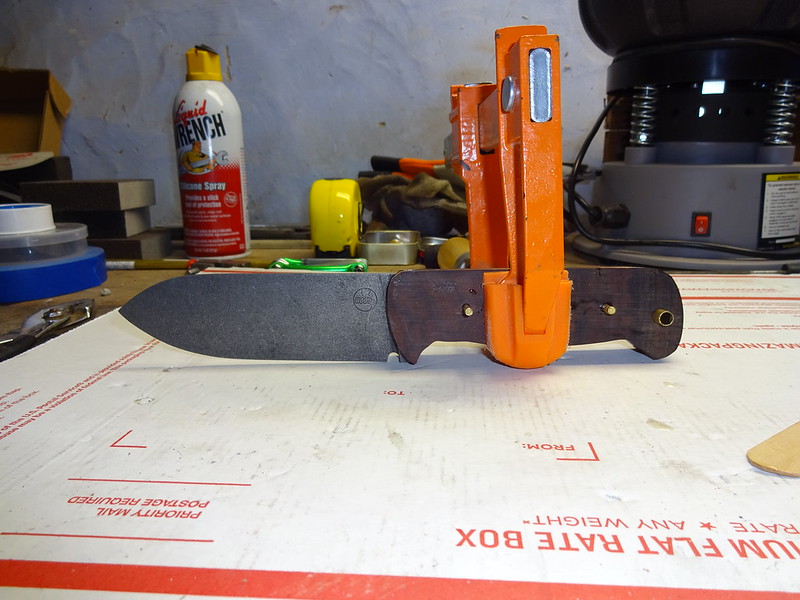
Anyone have any tips for removing scales once they have been epoxied and pinned?
I let the epoxy set for 2 days since i figured it was cold it may take longer to cure. Then decided i wanted to sand them down a bit so the handle wasnt so thick. I used the belt sander to do so. While doing that the scales started to separate from the tang.

I let the epoxy set for 2 days since i figured it was cold it may take longer to cure. Then decided i wanted to sand them down a bit so the handle wasnt so thick. I used the belt sander to do so. While doing that the scales started to separate from the tang.
- Joined
- Apr 20, 2013
- Messages
- 7,205
WW:
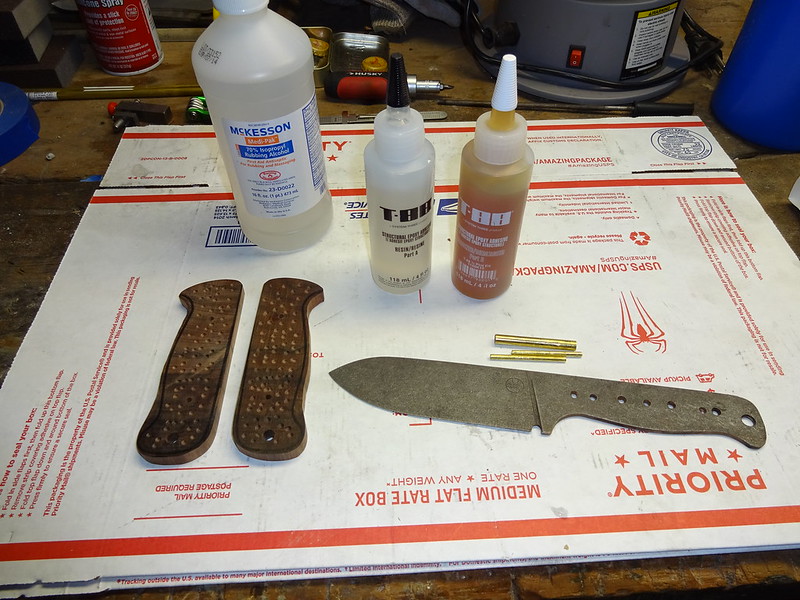
Most epoxy has a temperature range that it has to be cured in, or it won't work as well or at all. Since it's already separating (sorry about that....sucks, doesn't it?) you probably didn't get a good bond to begin with. Should just be able to get a chisel in there and pop the thing off. It's happened to me; the scales left a little wood behind where I did get a good bond, but I just used a sanding block to get the rest of the epoxy and wood off. Make sure next time that the steel is good and roughed up, cleaned well (I use alcohol or acetone; even skin oils will compromise the epoxy bond) and then clamp them with as many clamps as you can fit on there (if your previous post is any indication, that one solo clamp is likely the culprit - should have ones also in both the bolster and lanyard areas) in at least a 60°f or warmer space.
Good luck!
daizee
Knifemaker / Craftsman / Service Provider
- Joined
- Dec 30, 2009
- Messages
- 11,194
WW, it looks like that scale is tapered, and the surface is simply not flat.
To get it off once the epoxy is cured:
1) pre-heat toaster oven to 300F
2) place blade in toaster oven for 10-15 minutes
3) knock out pins on a bench block with a hammer and punch- use gloves
4) clean up remains
To get it off once the epoxy is cured:
1) pre-heat toaster oven to 300F
2) place blade in toaster oven for 10-15 minutes
3) knock out pins on a bench block with a hammer and punch- use gloves
4) clean up remains
- Joined
- Sep 30, 2012
- Messages
- 15,381
WW:
Most epoxy has a temperature range that it has to be cured in, or it won't work as well or at all. Since it's already separating (sorry about that....sucks, doesn't it?) you probably didn't get a good bond to begin with. Should just be able to get a chisel in there and pop the thing off. It's happened to me; the scales left a little wood behind where I did get a good bond, but I just used a sanding block to get the rest of the epoxy and wood off. Make sure next time that the steel is good and roughed up, cleaned well (I use alcohol or acetone; even skin oils will compromise the epoxy bond) and then clamp them with as many clamps as you can fit on there (if your previous post is any indication, that one solo clamp is likely the culprit - should have ones also in both the bolster and lanyard areas) in at least a 60°f or warmer space.
Good luck!
Thanks Mike! Does suck but it gives me more practice and teaches me something new so i guess i cant be too upset (says while mad at self)
After taking the picture i used a 2nd c-clamp on the top of the handle. And i used alcohol to clean both the wood and the tang before i started to epoxy it. Maybe not well enough though.
Im thinking i should get one of those reptile heat lamps and build a curing box to use from now on.
WW, it looks like that scale is tapered, and the surface is simply not flat.
To get it off once the epoxy is cured:
1) pre-heat toaster oven to 300F
2) place blade in toaster oven for 10-15 minutes
3) knock out pins on a bench block with a hammer and punch- use gloves
4) clean up remains
Thanks for the tips Daizee.
The scale is flat on the side of the tang, i was sanding it to thin it out and working on the top. SO the top outside is not flat. Both sides were the same before i started to thin it out. Im not sure if im explaining it right but you probably get what i mean LOL
Ill try this stuff out and start over on some fresh scales, thanks guys!!
NixKustoms
Sheath and Knife Maker
- Joined
- Dec 30, 2010
- Messages
- 5,888
Here are my Hex Hawks. The bottom hex cutout works on 1/4" screwdriver bits. The way the cut is done the bit will not slide all the way through, or slide up and down in use, the bit goes in 1 way only and sits in enough to use it but not enough to where your trying to hold the bit steady and turn the hawk. The top cutout is more for looks but it does function and work on bolts with a .43" head.
They will be getting stonewashed once complete, they will have sheaths and can easily go on a keychain as well.
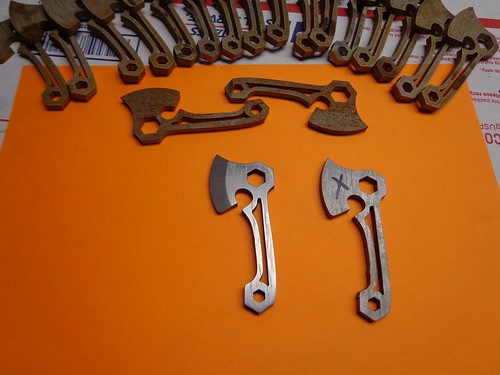

These are obviously not done or heat treated yet. Still lots to do with them. But ill have a video showing how they work in time.
Those are amazing!!! How and when can I get one?!

That's just awesome!!! Nicely done!
Dude, this is honestly one of the most elegant knives I've seen in a long time. I think it should replace the BK-13 in the line-up. In S35VN.
If you're referring to my 3" hunters, I can post pix of them all day.
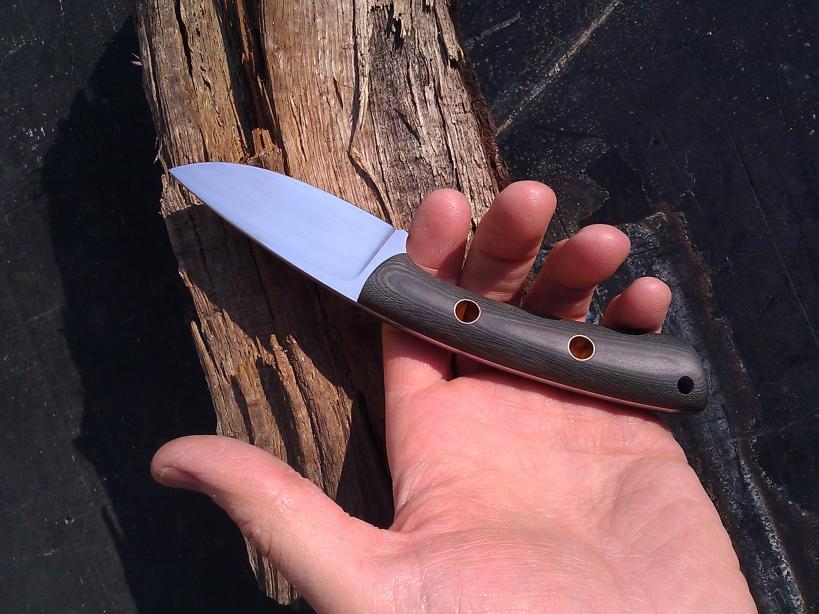
These were the two we used to completely disassemble the deer. Field dress to butchering. I only went to a longer blade when I had to move up to the kitchen to cut/pack the meat.
The resemblance of the front-end of the white-handled one to the BK-11 is no accident. My early blade patterns were definitely influenced by Ethan's drop-point lines.

Daizee, still making some amazing blades!

- Joined
- Sep 30, 2012
- Messages
- 15,381
Those are amazing!!! How and when can I get one?!
Thank you bud, the first batch is already spoken for, im starting a 2nd batch in January and most of that batch is spoken for as well. But i saved a few to list for sale in the exchange. I will put a link in my sig once they are completed. Keep an eye out!!
I really appreciate the interest and compliment!!
NixKustoms
Sheath and Knife Maker
- Joined
- Dec 30, 2010
- Messages
- 5,888
Nice! I will!

