Fallkniven A1 Pro review

Have you tried a microbevel, or do you always make a full zero-grind convex? Any performance differences?

I like the idea of zero grind, but if I'm out in the woods for a few days with just a DC4, I touch up by adding a microbevel to the F1. How do you manage it?


I don't like microbevels on my A1s because it reduces the performance.

The difference is huge.

I can touch them up just as well with a DC4


Here's a disclaimer,

My edge are maximumized for performance.

However if I make a mistake, my edge is toast.

Everything is a trade off

I can always microbevel for fast field repair.

However my margin for error is very small because of proper use and techniques so why not reward myself with better cutting power and efficiently?

Zero grind for the win.

The problem I see with zero grind is that people are laying these knives completely flat on the primary grind.

That's too acute for anything.

I sharpen a secondary convex edge to a zero at 15-20° dps then blend it into the primary

To the untrained eye it looks like it's completely zeroed from the top of the grind.

Its not.

So in the end, the dc4 can still touch up a zero grind, it just puts ugly Scratchs on the blade.

Doesn't bother me.

If you want to keep the factory finish then microbevel is the answer.


Shawn........

The A1Pro just continues to shine in your tests......not what I was expecting for such a thick blade

I was holding off on this knife because of the thickness too.

I thought they ruined it.


I was wrong.

It's my top performer.
 
I think it would be a good idea to give use some drawings ,to scale, of the edge cross-section ,please.
 
I think it would be a good idea to give use some drawings ,to scale, of the edge cross-section ,please.

Sure, but I'm no artist and it won't be to scale.


The flat grind saber is more acute behind the edge on the Pro.
 
Thanks ! Doesn't look like it would make that much difference

You could be right. I'm so obsessed with how well these knives carve in wood I'm probaby just pullin' hairs

But it seems to bite better and carve smoother.
 
I need a clarification please. When I see little difference between Standard and Pro dimensions ,, do you mean the grade of polish made the difference ??

Water soluable ???? AAArrgg !
 
Ooh

You meant between the Pro and the A1?

I couldn't draw them to scale.

The A1 Pro is thinner behind the edge then the A1

I thought we were talking about how I like to sharpen them.

Maybe in the future ,I can acquire pair of micrometers or better drawing scale and graph paper haha
 
Hi! Thanks a lot for posting this comprehensive comparison :thumbup:. As told you sometimes ago, I was really curious to understand in details which were the differences between the original and the Pro series. I think I got a good insight now :). For a week-end hiker - like I am - and for my needs today, I don't think I will change my original A1 for the new Pro. Not that improvements are negligible, but I don't think they matter so much for me, when comparing the two. Also, honestly, since some time, the A1 doesn't see much action. As fixed blade I pack his little brother, the F1 but, for most of my hikes now, a folder it's more than enough. Great review! Keep them coming, always a pleasure to read you. Take care.
 
Shawn,

I appreciate the time and thorough effort You have gone through, to show us how You use and sharpen Your knives.
It's not far from my own way of break in a new knife.

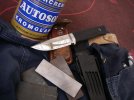
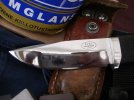
While watching Your waterstone video, I got inspired and started to work on the F1 Pro.
I'm halfway to a mirrorpolish, but it's easy to do the way You show it.
I didn't use my fullsize waterstone, just the CC4 and the older brown DC4 + 1000P/1200P wet&dry paper.
The polish was made with Autosol chromepolish on leather.

There are still work to do for a final finish, but this is a workingknife and it will soon get schratched and dinged up again, so I'll leave it as is.

attachment.php


attachment.php


Regards
Mikael

IMGP6251.jpg

IMGP6252.jpg
 
When commenting on a compass with a mirror , the girl told us it's so you can look good when you get rescued !!! I guess that's true with your mirror polished knives ! LOLLOL
Keep up the good work !
 
Mikael, Wow, great work! So shinny!

That's amazing with just a CC4, two grits of sandpaper and metal polish.

Looks better then mine!
 
When commenting on a compass with a mirror , the girl told us it's so you can look good when you get rescued !!! I guess that's true with your mirror polished knives ! LOLLOL
Keep up the good work !

Yes :D, a polished surface on a survival knife is of course out of place, but it's tempting to give the whole grind an even finish rather than just the edge.
A polished grind also decrease binding, when working in wood.
So, it actually has a function!


Regards
Mikael
 
Mikael, Wow, great work! So shinny!

That's amazing with just a CC4, two grits of sandpaper and metal polish.

Looks better then mine!

The CC4 is very effective on the Cos/420j2 steels!
Especially when used wet.

I also used the older brown DC 4 stone for a finer gritsize, before the wet/dry paper.
It's still much work before a real mirrorpolish, but it's possible to do with just the DC/CC stones from Fällkniven + Autosol on leather.


Regards
Mikael
 
Last edited:
Awesome video, thanks. How does it do with batoning wood? With that 7 mil spine, I'd imagine it would hold up pretty well.
 
The CC4 is very effective on the Cos/420j2 steels!
Especially when used wet.

I also used the older brown DC 4 stone for a finer gritsize, before the wet/dry paper.
It's still much work before a real mirrorpolish, but it's possible to do with just the DC/CC stones from Fällkniven + Autosol on leather.


Regards
Mikael

Great work Mikael
Thank you for sharing.

Awesome video, thanks. How does it do with batoning wood? With that 7 mil spine, I'd imagine it would hold up pretty well.

It's a beast man.


Heres a First Person hard Use testing video.

[youtube]sNaWId98Vf0[/YouTube]
 
Enough,enough.....I'm sold.........okay maybe some more just because it can
 
The guard is pinned and epoxied to the blade, so it's strange that it became loose.
The pin is actually around 1/8" behind the guard and goes through 2 sheathmetal plates on each side of the tang.
It's the plates that prevents the guard to move backwards.

There are a few ways to fix a loose guard on a thermorun handle.

The first way is to send it to FK in Sweden for a rehandle.
This is expensive if the vendor doesn't cover the shipping under warranty.

The second way is something I have tried on both Fällkniven and Bark River knives.
With the saw on my LM multi-tool, I made a slot in the thermorun just behind the guard (it was the FK Kolt Knife).
I cut away the rubber all the way down to the tang.
I then used a worn Fireline, a black Dyneemafiber fishingline from Berkley.
The line was tied to the tang and soaked in a few drops of epoxy and was wrapped tight around the tang, until the slot was filled.
When the epoxy had cured, I shaped the Fireline into a spacer and finished with clear epoxy.

A third way is a complete custom rehandle and I finally did that on the Kolt Knife, when I got my hands on a fine piece of stag.


Regards
Mikael
 
Last edited:
Enough,enough.....I'm sold.........okay maybe some more just because it can

:D

The guard is pinned and epoxied to the blade, so it's strange that it became loose.
The pin is actually around 1/8" behind the guard and goes through 2 sheathmetal plates on each side of the tang.
It's the plates who prevents the guard to move backwards.

There are a few ways to fix a loose guard on a thermorun handle.

The first way is to send it to FK in Sweden for a rehandle.
This is expensive if the vendor doesn't cover the shipping under warranty.

The second way is something I have tried on both Fällkniven and Bark River knives.
With the saw on my LM multi-tool, I made a slot in the thermorun just behind the guard (it was the FK Kolt Knife).
I cut away the rubber all the way down to the tang.
I then used a worn Fireline, a black Dyneemafiber fishingline from Berkley.
The line was tied to the tang and soaked in a few drops of epoxy and was wrapped tight around the tang, until the slot was filled.
When the epoxy had cured, I shaped the Fireline into a spacer and finished with clear epoxy.

A third way is a complete custom rehandle and I finally did that on the Kolt Knife, when I got my hands on a fine piece of stag.


Regards
Mikael

Great advice man.:thumbup:

Im just going to sent it back to Sweden

I talked to Eric, sounds like he going to get it taken care of.

However if it happens, again

its time to step my re handle game up

because this is the best blade I've used so far.
 
Back
Top