Making a pouch sheath - Apprentice Thread.

I am really liking that pouch design. I have been contemplating adding that type of sheath back to my line up. Well done.

You guys are getting too good!

TF
 
M4Super9,
I'm really liking what you did with that one, too. I've been too busy to start #2 yet, but you give me inspiration to get going. I thought you were dying them black, but now I'm seeing more of a dark burgandy; what is it? Nice job!
Rich

Feibing #124 Dark Brown, mixed 50/50 with denatured alcohol. I wet the leather with 30% denatured alcohol/70% water from a spray bottle and then spread with a wool dauber. I do a several coats at one stage and let it dry. I make final modifications, flatten edges and then do it again just before stitching. I couldn't get the holes to line up during gluing on the first sheath. This time I punched the top side and the belt loop, glued the welt and roughed the edges. I then dyed it, stitched the belt loop and glued it up. After gluing I re-punched the holes and cut the grove on the back and did the final edge sanding. Then I went back over the whole thing with dye again before stitching. I coated in Tan Kote afterwards. Color in the photos is a bit off. It's a dark chocolate brown with a red tint. Looks almost black in artificial light, but the brown really comes out in sunlight. The stuff that comes off when you rub it with the Tan Kote is almost olive green. I plan to try a third design when I have time.
 
Last edited:
I am really liking that pouch design. I have been contemplating adding that type of sheath back to my line up. Well done.

You guys are getting too good!

TF

Thanks. I could not have done it this well after only a few attempts without your tutorial.

I don't ever plan to do this and sell them, but it is certainly fun for my own knives and will be great for sentimental gifts for family and friends. It most certainly has made me think a lot more about sheath designs and appreciate how much work goes into the leather. I probably won't ever evaluate the sheaths construction same way again.
 
When I was contemplating doing this whole thread. I worried about taking business away from sheath makers on this forum in particular. Then I realized that the people who were interested in doing this were going to learn regardless - and that those who did it would realize why quality leather is priced the way it is.

With all of that said - it is funny. When you learn to make one of these - and you see a mass produced sheath on a nice knife you get a little uppity. I think to myself - why would you put THAT on that nice knife. I could do better than THAT! ;)

Oh - one last thing. Your initial stamps you use are generally 'self spacing'. Here is what I recommend for what you are doing. Tape your two stamps together and tap them both at the same time. With some practice on scraps they should always be aligned to one another.

OR - use the round border of your makers mark to follow as a guide and stamp them individually. In this way they will always be a bit crooked - but that will be a design - not a mistake. ;)

TF
 
Last edited:
I've only just found this thread .
What a great idea , and can I also say outstanding work .
I've only just got into making my own folder sheaths recently and in my opinion there is no greater sense of satisfaction than to wear a sheath of your own making .

Keep the photos and updates coming .

Ken
 
When I was contemplating doing this whole thread. I worried about taking business away from sheath makers on this forum in particular. Then I realized that the people who were interested in doing this were going to learn regardless - and that those who did it would realize why quality leather is priced the way it is.

With all of that said - it is funny. When you learn to make one of these - and you see a mass produced sheath on a nice knife you get a little uppity. I think to myself - why would you put THAT on that nice knife. I could do better than THAT! ;)

TF

I never worry about that. I've seen quite a few people who complain about pricing say I can do that and then start out on the kitchen table figuring they are going to get rich by undercutting you. After a short while they give up once they realize you actually need more than 25 fun tickets a sheath to continue. Bills, inventory, taxes etc.
The cost factor and time involved to take it to a business level is something not many people are willing or able to do with a current day job. Not saying it can't be done because it is exactly what I did. I think it was BuyBrown who stated if you want to make a fortune in the sheath business you need to start with a fortune. :D I have found that to be very true.

I despise people who hoard knowledge and would rather take it to the grave than share. Where were you 3 or 4 years ago Tal, when I needed some help jeez! :D

The main problem with those demon cursed alphabet/number stamps is that they are not uniform when they are cast. I have found that you need to line them up on some scraps and then tape them together once you get them lined up. I hate them with a passion. I need to find a good machinist to make me a set.
 
I’ve had the good fortune to come to own a few sheaths from some talented makers and had decided long ago to try my hand at making my own when I found the time. My schedule was expedited this December when my loving wife bought me a shoulder from Tandy’s for our third (leather) anniversary along with a few tools.

Having owned a few Fiddleback’s I was already eyeballing Tal’s sheaths and was lined up to purchase one. Then, along came the apprentice thread, which I jumped on and followed up with Tal. As fate would have it I was traveling through his part of the country at the beginning of this year and had the amazing opportunity to stop by and help build the sheath I wanted to buy for a Fiddleback Bushfinger. It turned out as I had hoped and dreamed, plus I learned a great deal firsthand along the way (thanks AGAIN Tal!). Here is a picture of the finished product:


Around the same time, luck brought me to Paul Long’s backyard where my father has a ranch. I had given my father a knife for Christmas, my third to complete, and we stopped by Mr. Long’s to have a sheath fashioned for it. He was a gentleman and a scholar, taking the time to educate and turn around a wonderful sheath in short time. Here is a quick peek:


So… after these amazing experiences I did my homework as advised and have watched all of Tal’s videos as well as a couple from Chuck Burrows and the great Paul Long. I also made a return trip to Tandy’s to pick up some “essentials.”
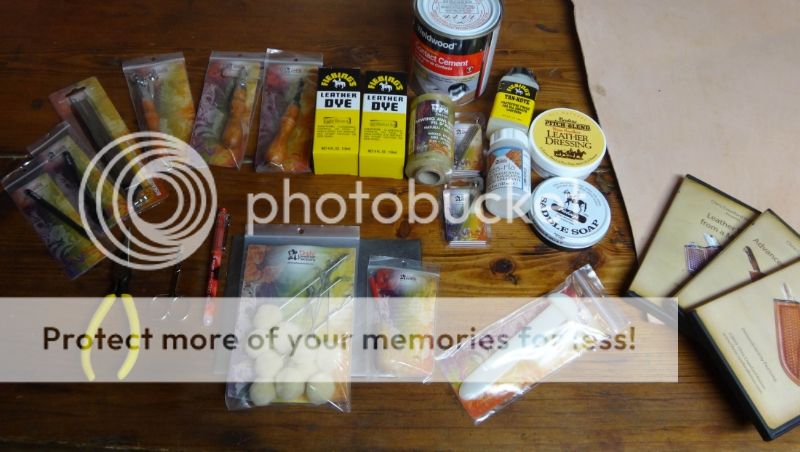

I would have hacked at the leather anyway, but due to the type of folks we’ve got here I’ve gotten sage advice and guidance along the way. I’ve also been happy to help support those teachers wherever and whenever possible. For my own first sheath I’ve decided to go for a butterfly pouch style sheath designed to fit a Fiddleback Recluse. Thanks again to everyone involved and any/all feedback is appreciated :)!


Cheers,
David
Leather Bending Apprentice
 
Last edited:
David (Leather Bending Apprentice),
It looks like you're well on your way! And you've gotten some great personal instruction from some very knowledgeable folks. I'm finding that sheath-making is not only addictive --it also gives me a much greater appreciation of what I'm buying when I acquire a great sheath from one of the experts. I've finished one, and already have several more cut out or planned; and may have to buy more knives to fill the sheaths!
 
Making a couple extras this week for fun. Realized that I have absolutely no sheaths of my own, Again, so I may even keep one. People stop by at times and buy up any extras I have floating around.

DSC_0056_zps7cf9142d.jpg


DSC_0058_zps322eafdc.jpg


DSC_0062_zpse802e6ff.jpg
 
Very cool, Sky. I can see I need more spring clamps! I'm guessing that those rectangular pieces are for firesteel loops?
Rich
 
Yep, I'm always a fan of having a firesteel. I have literally hundreds of those ratchet clamps they work great for this stuff, spring clamps always tend to have a little too much force and leave indents.
 
Yep, I'm always a fan of having a firesteel. I have literally hundreds of those ratchet clamps they work great for this stuff, spring clamps always tend to have a little too much force and leave indents.


May I ask what model those ratchet clamps are? or where you bought them? I'm having the worst time getting one's small enough to fit this kind of work but actually built well enough to do the job. I found out the hard way that spring clamps make a mess of your work. I moved to binder clips (for papers) and they are certainly better but still leave some marks, depending on how thick your work is.

I bought a couple different ratchet clamp sets online but they were all cheap, chinese garbage. Most of them had plastic teeth for the ratchet and would strip out after 1 or 2 uses....so I'm back to binder clips for now until I find something soft enough to work with the leather but hard enough to actually hold it tight to get a good glue.
 
When using any type of clip or clamp, use tongue depressors under the clamp on both sides. Cheap to buy, can be cut to any length, thin and don't leave any marks.
 
When using any type of clip or clamp, use tongue depressors under the clamp on both sides. Cheap to buy, can be cut to any length, thin and don't leave any marks.

AHHHHHH! Lol, Why didn't I think of that!! and I spent all that time cutting out strips too. Off to the dollar store.

Solid- They are marketed under a bunch of different names with different colored ends. I got mine from cripe distributing, they run about a buck each and come in 4 packs.
 
I use welts for the knife pattern that I am gluing up. I use spring clamps over the top of these as padding.

However - if the glue is totally dry - I will tap it in place and then stitch. I find I don't need the clamps.

TF
 
I really do the same as Tal after gluing up. Light taps with a flat faced hammer sets the contact cement and can be cushioned with another piece of leather. Years ago I found an auto body working hammer at a flea market, paid a couple of bucks, polished the face and now it does double duty with leather and finish forging.
 
Finished up sheath #2, for the EDCII this time. Switched things up a bit. Did my best at ripping off Tal's style. Did some hammering. Fixed some of my mistakes from the first time around and made plenty more. Used a diamond punch and awl this time instead of the lacing thong. Seems to work better, I like how the holes close up. But harder to keep an even stitch. Worked more on the burnishing this time. I'll say it again, you pros are pros.

Anyway, here it is for your critique:

(sorry about the crappy pictures. Huge shine on the sheath from the Tan-kote and the glare wrecking havoc on my camera. See my final lesson learned)

IMG_3093_zps79b758f4.jpg~original


IMG_3081_zpsc2bf527f.jpg~original


IMG_3086_zps4418cbc0.jpg~original


IMG_3089_zps306e5efa.jpg~original


Here you can see the loop starts wrapping around:
IMG_3096_zpsb1bb5eea.jpg~original


From my lessons learned file this time around:

  • I need better leather. The economy shoulder from Tandy is pretty rough. Gonna look into some of the other sources folks have mentioned.
  • I forgot to dye the inside of the welt that shows when looking into the sheath.
  • I need to do better with the edge beveler and sand it down and even it out. I noticed after I dyed that it looked like crap. Gonna go back and see if I can touch it up with some sandpaper and re-dye
  • I still can't get the placement of the loop right. This one is too close to the fold and in a weird spot. Also, it's not long enough and will only fit a 1 1/2" belt.
  • Plenty of marks on the grain from me not going slow and being careful.
  • ...
  • I need to stop buying knives and invest in a good camera.

Thanks again Tal for the tutorial and videos and to everyone that's given input and tips and shown their works as well. What a great community.
 
Last edited:
Finally got around to making a second sheath. This is my first attempt at one using Tals pattern. The sheath will work fine but it does have some problems, most of which were from me not taking my time and trying to hurry and get the sheath done. The most pesky problem is that I did not get the thread for the belt loop recessed in the groove enough on the inside so I have to be careful when sliding the knife in or it will catch the threads a bit. Gotta figure out how to get a better groove, went over it a couple times with the edge groover but it dosent seem to put a good groove in that flesh side of the leather. I also am starting to see how better leather would make for some better sheaths.

Bushcrafter%20sheath.jpg
 
Thurin:

1) If you want to redo the edging - tape the sheath through the belt loop to protect it from anything silly. Blue painters leaves no residue. Sand back the edges a bit more and burnish them again. Then with a q-tip redye the edges. I think they look pretty good.

2) Use the q-tip on the welt on the inside too.


P&G: It could be that the flesh side is clogging up the hole on your groover. Try pushing the hole clear with a pin and give it another shot.


Both of you guys are doing good work. Practice on that leather you have - you can always give away a sheath or two - or make beaters for knives around the house.

I think both works look great. Your stitching is mostly straight, your detail work is great - the pair shader use on Thurin's and the P&G's groves I like a lot.

Well done you guys.

TF
 
Back
Top