-
The BladeForums.com 2024 Traditional Knife is available! Price is $250 ea (shipped within CONUS).
Order here: https://www.bladeforums.com/help/2024-traditional/
You are using an out of date browser. It may not display this or other websites correctly.
You should upgrade or use an alternative browser.
You should upgrade or use an alternative browser.
March of Dimes fundraiser 2011 WIP
- Thread starter John M Cohea
- Start date
")
I have the March of Dimes knife now. Hoping in get something started on it next week.
Joe
www.masonengraving.com
Joe
www.masonengraving.com
- Joined
- Oct 24, 2007
- Messages
- 2,655
Looking forward to seeing what you come up with Joe!
- Joined
- Dec 20, 2009
- Messages
- 4,423
John asked me to corroborate with him on the display stand for the 2011 March of Dimes knife. He also asked me to do some snapshots along the way since this is a WIP thread.
We decided I would provide the base with some sort of mosaics in it so I thought a mosaic name placard would be nice. I realize I'm "making the box for the piano and not the piano" but I hope you enjoy it anyway.
I started by cutting some diagonal spalted birch slabs on the band mill and picking out the nicest one.

Here I have laid out the rough oval shape we want to use, it's roughly 15 inches by 8 inches and 2 inches thick.

Here I've cut out the oval and used blue masking tape to form a barrier to contain some casting resin to stabilize the slab. Since spalted birch is very near rotten, it is necessary to stabilize it. I'm using West Systems clear casting resin; it hardens up harder than epoxy, absorbs into wood very well and finishes up real nice. It's hard to get a good finish on epoxy. I mixed up a cup at a time of the resin and poured it on, when the first cup was mostly absorbed I poured on some more. Spalted birch is like a sponge, I used two cups on the top. When the top was curing well, after about eight hours, flipped it over and did the same thing on the bottom.

After waiting three days for the resin to cure up hard I sanded it good and flat and rounded the corners over with the router. Then I sanded it to 320 grit. The finish size is about 14 X 7 1/2 X 1 3/4.

Here it is after the first "flooding" of the surface with pure tung oil. The wood is still pretty thirsty, even after stabilizing so the pure tung oil, being thicker, will take fewer coats to seal it up. I am doing the bottom too, to insure against warping. I can switch to another oil if I think I need to after two or three coats of this. The oil needs a day between coats to cure so you really need to plan ahead on a job like this if you have a deadline, like I do In the mean time I can start on the name placard.
We decided I would provide the base with some sort of mosaics in it so I thought a mosaic name placard would be nice. I realize I'm "making the box for the piano and not the piano" but I hope you enjoy it anyway.
I started by cutting some diagonal spalted birch slabs on the band mill and picking out the nicest one.
Here I have laid out the rough oval shape we want to use, it's roughly 15 inches by 8 inches and 2 inches thick.
Here I've cut out the oval and used blue masking tape to form a barrier to contain some casting resin to stabilize the slab. Since spalted birch is very near rotten, it is necessary to stabilize it. I'm using West Systems clear casting resin; it hardens up harder than epoxy, absorbs into wood very well and finishes up real nice. It's hard to get a good finish on epoxy. I mixed up a cup at a time of the resin and poured it on, when the first cup was mostly absorbed I poured on some more. Spalted birch is like a sponge, I used two cups on the top. When the top was curing well, after about eight hours, flipped it over and did the same thing on the bottom.
After waiting three days for the resin to cure up hard I sanded it good and flat and rounded the corners over with the router. Then I sanded it to 320 grit. The finish size is about 14 X 7 1/2 X 1 3/4.
Here it is after the first "flooding" of the surface with pure tung oil. The wood is still pretty thirsty, even after stabilizing so the pure tung oil, being thicker, will take fewer coats to seal it up. I am doing the bottom too, to insure against warping. I can switch to another oil if I think I need to after two or three coats of this. The oil needs a day between coats to cure so you really need to plan ahead on a job like this if you have a deadline, like I do
In the mean time I can start on the name placard.- Joined
- Dec 20, 2009
- Messages
- 4,423
Nice slab of wood, Mark. I think the knife will display very well on it.
David
That knife would look good on a slippery slug trail over a moldy Hungarian goulash.
- Joined
- Dec 13, 2005
- Messages
- 289
That knife would look good on a slippery slug trail over a moldy Hungarian goulash.
Ahh, goulash! Almost dinner time here. Sounds good, mold and all.
Thanks
- Joined
- Feb 28, 2006
- Messages
- 3,494
This is all-around every-which-way AWESOME guys!!! THANKS!!!!!!
- Joined
- Oct 24, 2007
- Messages
- 2,655
Nice slab of wood, Mark. I think the knife will display very well on it.
David
Could'nt agree more:thumbup::thumbup:Thanks Mark!


- Joined
- Dec 13, 2005
- Messages
- 289
How's this for sweet, Roger?
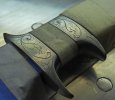
Joe sent me some pictures of the work he's doing on the knife.
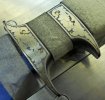
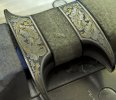
1. The artwork has been transferred to the guard. Joe has cut in the outline of the leaves and started the grooves for the gold inlay.
2. Here is a better picture showing the grooves ready for the gold.
3. The gold has been inlaid and flushed down to the level of the fittings.
4. The background has been removed.
Now the detail work begins.
I've worked with other engravers before, but never Joe. I'm sure liking what he's doing!
David
Joe sent me some pictures of the work he's doing on the knife.
1. The artwork has been transferred to the guard. Joe has cut in the outline of the leaves and started the grooves for the gold inlay.
2. Here is a better picture showing the grooves ready for the gold.
3. The gold has been inlaid and flushed down to the level of the fittings.
4. The background has been removed.
Now the detail work begins.
I've worked with other engravers before, but never Joe. I'm sure liking what he's doing!
David
Attachments

- Joined
- Oct 24, 2007
- Messages
- 2,655
VERY impressive Joe!Really looking forward to seeing this progress:thumbup::thumbup:!
- Joined
- Dec 2, 1999
- Messages
- 9,910
Well it's not often we get to see the engraving process unfold in stages - that's a real treat. :thumbup:
Roger
Exactly! This is a treat for me.
- Joined
- Dec 2, 1999
- Messages
- 9,910
oops sorry, got so excited I clicked twice.
- Joined
- Dec 13, 2005
- Messages
- 289
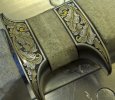
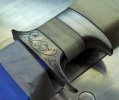
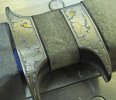
Joe sent me some more pictures.
1. Joe finished removing the background, trimmed all the leaves, flattened the background, and stippled it.
2. All of the shading has been completed.
3. Joe normally doesn't paint the background until he's finished with the entire project, but he did it here so you can see the finished work on this side.
Tomorrow he's doing the same thing on the other side. It will take a couple of days like this side. Then about a half day to complete the two buttons. Sounds like he's going to be done on Friday.
I've attended Ray Cover's engraving class so I've seen this done in the various stages, but I still enjoy seeing it in process.
And I'm liking Joe's work so much that I'm itching to get him to do another project. He's really doing a great job!
David