-
The BladeForums.com 2024 Traditional Knife is available! Price is $250 ea (shipped within CONUS).
Order here: https://www.bladeforums.com/help/2024-traditional/
You are using an out of date browser. It may not display this or other websites correctly.
You should upgrade or use an alternative browser.
You should upgrade or use an alternative browser.
Modified Production Knives (traditional only)
- Thread starter supratentorial
- Start date
black mamba
Gold Member
- Joined
- Oct 21, 2009
- Messages
- 24,239
Thanks to both of you.
black mamba
Gold Member
- Joined
- Oct 21, 2009
- Messages
- 24,239
Do you have any before pics for reference?
Sorry, no, didn't take one. It was a full sized spey blade, just like this one from a different knife of the same model.

blademan 13
Gold Member
- Joined
- Jan 25, 2000
- Messages
- 4,494
Great job, Jeff! Looks great :thumbup:
black mamba
Gold Member
- Joined
- Oct 21, 2009
- Messages
- 24,239
Thanks, Jamie!
- Joined
- Jul 30, 2009
- Messages
- 4,809
Excellent work on that #71 Kirkwood!! For me, I'd probably like a sheepsfoot on the #71... something for me to ponder further.
That #73 looks great Jeff!! Not exactly the same but my Alsdorf Wharncliffe Trapper seems to have the same basic idea of a low sitting, shorter length wharncliffe/sheepsfoot blade instead of a full length/tall wharncliffe.
I've got one to show although the main results probably aren't as good looking... I have this Cripple Creek jack that was made by GEC based on the #73 frame. Here are before and after pics. I loved the knife except for 2 things. First, the pen blade had a 9 pull and the match striker nail nick made it hard to open. No pics for this but I rounded the tang slightly on the pen blade and now it's about a 6. The main blade is a soft 5. Second, the stag on the pile side was about twice the thickness of the mark side and it had a high ridge in the center. I sanded down the stag to make it more even. Unfortunately, most of the bark was lost... but the bark was "lost" on the knife to begin with because I never carried the lop sided knife. I left it rough figuring it'll smooth out with use and hopefully darken a bit. I also just touched the mark side to make it look a little different. Looking at the thickness now, its still not totally even but much more pleasing to me.


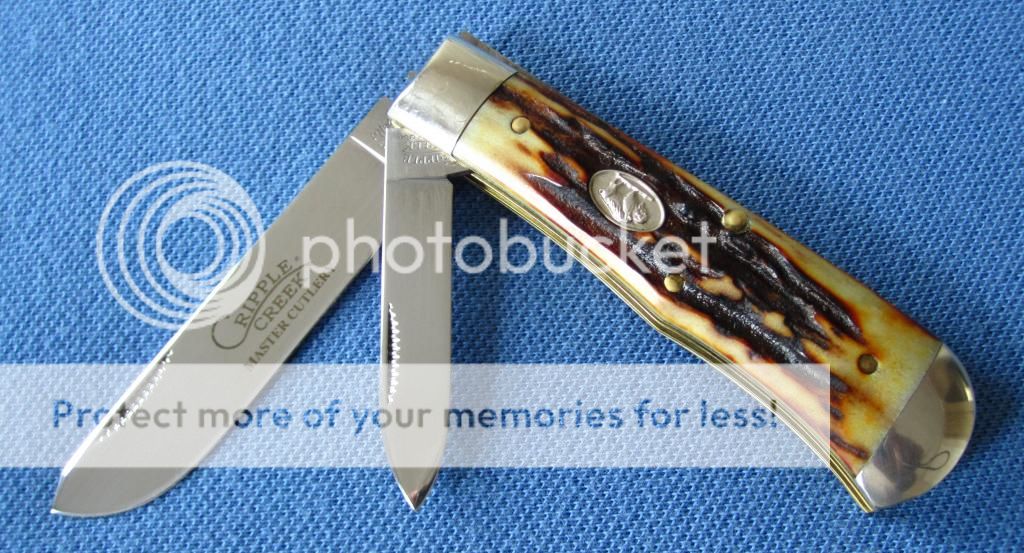
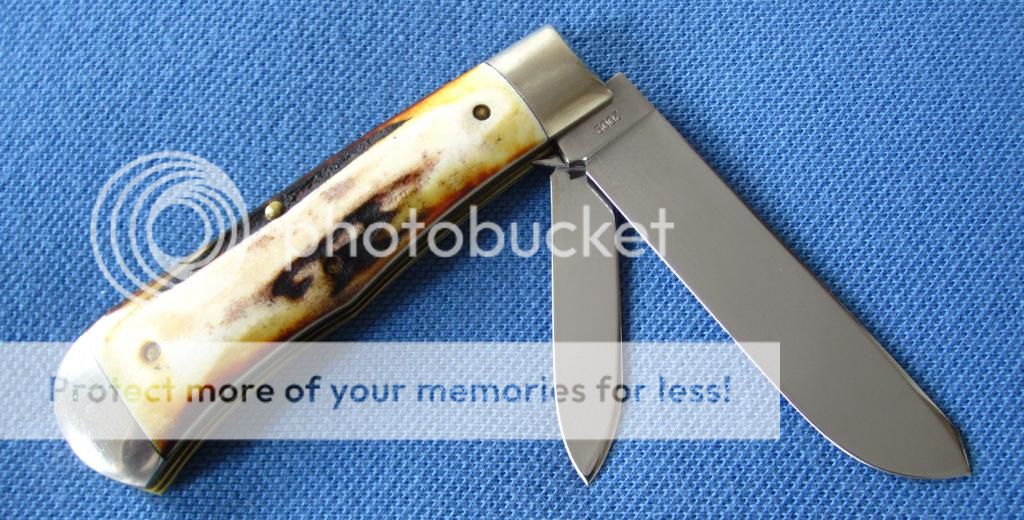
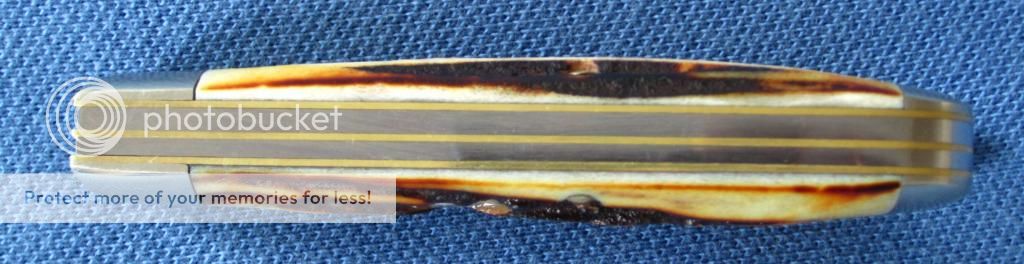
Being that I haven't carried it in a bit, I rubbed/left a lot of oil on the stag which contributes to the wet look in the last 3 pics.
That #73 looks great Jeff!! Not exactly the same but my Alsdorf Wharncliffe Trapper seems to have the same basic idea of a low sitting, shorter length wharncliffe/sheepsfoot blade instead of a full length/tall wharncliffe.
I've got one to show although the main results probably aren't as good looking... I have this Cripple Creek jack that was made by GEC based on the #73 frame. Here are before and after pics. I loved the knife except for 2 things. First, the pen blade had a 9 pull and the match striker nail nick made it hard to open. No pics for this but I rounded the tang slightly on the pen blade and now it's about a 6. The main blade is a soft 5. Second, the stag on the pile side was about twice the thickness of the mark side and it had a high ridge in the center. I sanded down the stag to make it more even. Unfortunately, most of the bark was lost... but the bark was "lost" on the knife to begin with because I never carried the lop sided knife. I left it rough figuring it'll smooth out with use and hopefully darken a bit. I also just touched the mark side to make it look a little different. Looking at the thickness now, its still not totally even but much more pleasing to me.


Being that I haven't carried it in a bit, I rubbed/left a lot of oil on the stag which contributes to the wet look in the last 3 pics.
black mamba
Gold Member
- Joined
- Oct 21, 2009
- Messages
- 24,239
It certainly looks more ergonomic now, Trand. Maybe you could go all the way and rough up the center smooth part that you sanded away (dremel mayby?) and then torch it to add some color back, or possibly some leather dye. Still, I prefer the "after" version.
- Joined
- Mar 9, 2013
- Messages
- 469
Here are a couple of my favorite modified production knives.
The first is this large Winchester Congress knife. I bought it from someone who replaced the handles with stag he found in the Georgia woods. It originally had waterfall celluloid handles that gassed out and rusted the knife. This knife had redundant sheepsfoot and pen blades, which bothers me. I serrated one sheepsfoot (very easy to do, by the way) and reprofiled one of the pen blades into a flat ground whittling blade. I now have a very useful multi-purpose knife, with super strong springs and rock solid walk and talk.

This Henckels (Boker) had redundant sheepsfoot blades, and I serrated one as well. I flat ground the remaining blades for whittling.

For certain tasks, I find serrated blades very useful, and it is not easy to find traditional knives with serrated blades. Also, I rarely get a knife that can whittle properly from the production line.
The first is this large Winchester Congress knife. I bought it from someone who replaced the handles with stag he found in the Georgia woods. It originally had waterfall celluloid handles that gassed out and rusted the knife. This knife had redundant sheepsfoot and pen blades, which bothers me. I serrated one sheepsfoot (very easy to do, by the way) and reprofiled one of the pen blades into a flat ground whittling blade. I now have a very useful multi-purpose knife, with super strong springs and rock solid walk and talk.
This Henckels (Boker) had redundant sheepsfoot blades, and I serrated one as well. I flat ground the remaining blades for whittling.
For certain tasks, I find serrated blades very useful, and it is not easy to find traditional knives with serrated blades. Also, I rarely get a knife that can whittle properly from the production line.
- Joined
- Jan 18, 2007
- Messages
- 34,184
Trand, rather than torching the stag (risky procedure...) why not try dyeing it in hot strong tea? Works well on stag for faux ageing or darkening. The stag can go a bit soft at first-depends on the pith aspect-but it reverts to normal in a few hours.
- Joined
- Nov 15, 2007
- Messages
- 3,372
dma, your knives look great. I love the serration on the blades it's a clever idea :thumbup: How did you do it? files?
Mike
Mike
- Joined
- Mar 9, 2013
- Messages
- 469
dma, your knives look great. I love the serration on the blades it's a clever idea :thumbup: How did you do it? files?
Mike
Thanks Mike! You start by marking the edge with a sharpie. I use 1/4 inches. The mark represents the center of the serration (not the tooth). I then use my Sharpmaker diamond stick sharp edge to very carefully nick the edge on the mark. I start with 10 even strokes per mark. This can also be done with a sharp file edge, but diamond is much faster and less prone to slip.
I then switch to a round diamond serrated knife sharpening stick. It is shaped like a long and thin cone (narrow at the tip and gradually widening as you get to the hilt). You can find them on eBay. I use one made by Buck. With this I do around 20 long and slow strokes per serration before moving to the next. I hold the diamond sharpening stick at a fairly steep angle to get nice and deep serrations. I keep repeating this until I have what I like. This is all done on only 1 side of the blade.
When all done, you will have a major burr on the other side of the blade. Carefully remove it by gently running it over a fine stone. I then strop the cut side at an angle, and the other side almost flat. When it gets dull (which takes a long time) just touch it up with a few strokes of the sharpening stick per serration.
I also do some with staggered serrations by doing 30 strokes on one, then 20 on the next 2, then 30, then 2 more with 20 , etc.
As I said, it is easy, but takes time. Practice on a cheap blade if you are worried, but I got perfect results my first try. The most important steps are the initial measuring, and the initial nick on the edge to serve as the guide for the rest of the process.
- Joined
- Jul 30, 2009
- Messages
- 4,809
Trand, rather than torching the stag (risky procedure...) why not try dyeing it in hot strong tea? Works well on stag for faux ageing or darkening. The stag can go a bit soft at first-depends on the pith aspect-but it reverts to normal in a few hours.
This was another thought Will. I haven't torched it but I have rubbed a little oil on it with my thumb. This morning I rubbed a little black coffee on it and let it dry and its definitely darkening. I think I'll go with coffee for a few more days and see how it turns out
")
- Joined
- Nov 15, 2007
- Messages
- 3,372
Thanks Mike! You start by marking the edge with a sharpie. I use 1/4 inches. The mark represents the center of the serration (not the tooth). I then use my Sharpmaker diamond stick sharp edge to very carefully nick the edge on the mark. I start with 10 even strokes per mark. This can also be done with a sharp file edge, but diamond is much faster and less prone to slip.
I then switch to a round diamond serrated knife sharpening stick. It is shaped like a long and thin cone (narrow at the tip and gradually widening as you get to the hilt). You can find them on eBay. I use one made by Buck. With this I do around 20 long and slow strokes per serration before moving to the next. I hold the diamond sharpening stick at a fairly steep angle to get nice and deep serrations. I keep repeating this until I have what I like. This is all done on only 1 side of the blade.
When all done, you will have a major burr on the other side of the blade. Carefully remove it by gently running it over a fine stone. I then strop the cut side at an angle, and the other side almost flat. When it gets dull (which takes a long time) just touch it up with a few strokes of the sharpening stick per serration.
I also do some with staggered serrations by doing 30 strokes on one, then 20 on the next 2, then 30, then 2 more with 20 , etc.
As I said, it is easy, but takes time. Practice on a cheap blade if you are worried, but I got perfect results my first try. The most important steps are the initial measuring, and the initial nick on the edge to serve as the guide for the rest of the process.
Thank you for taking the time, I probably try it soon.
Mike


