Mod'ing The CS Trail Hawk

Yes you could. . .I bet if you wanted to you could do a Craigslist search for bullet molds or casting ingot molds (the stuff that reloaders use) and get them really cheap.

I picked up 3 casting ladles and a 4-ingot mold for $5 for everthing locally here.

There is also QuickSteel and FastSteel. . .available for steel, aluminum, copper, brass, etc. . .just do a search for it.
 
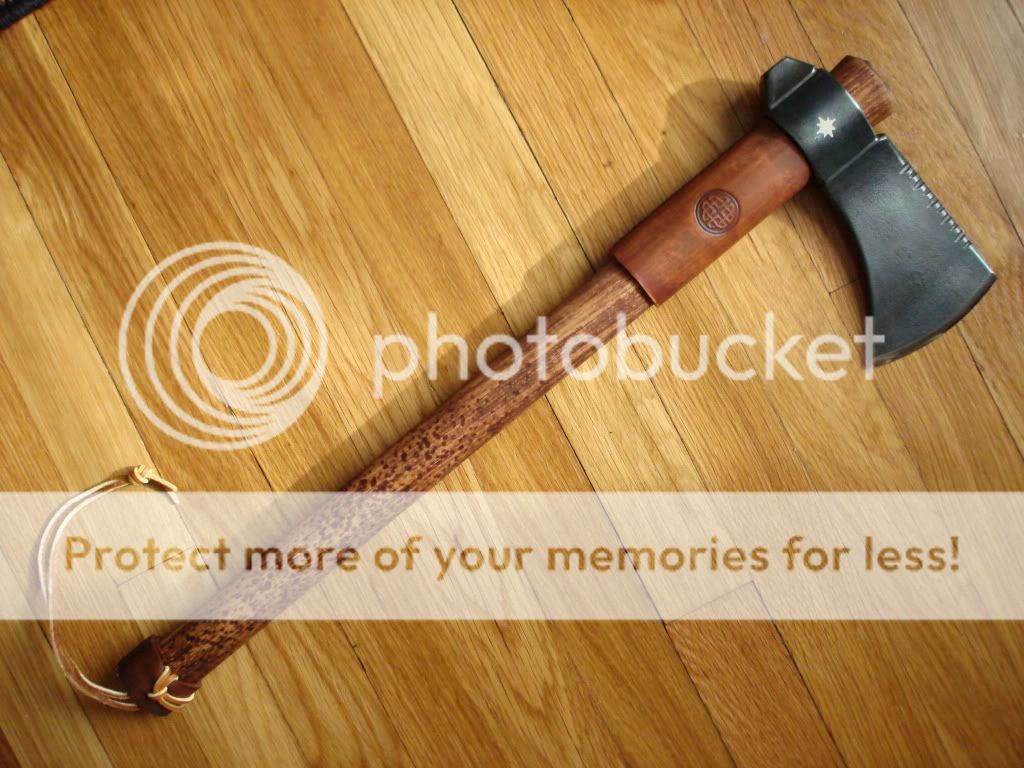
Messed with my old Riflemans Hawk last week.... here's what I ended up with:

006-6.jpg

007-4.jpg

005-10.jpg

008-1.jpg


...I decided to use a longer 22" haft, and knock off the hammer poll for better ballance.
This was my first try using leather on a hawk, it was a learning experience. I made some mistakes but will do better next time. :)
Tried to give the lower part of the handle some more grip by denting in the wood in a stippling process, my wife says I should call it "dappled" -like the horse. :)
Gave it some tacks on both ends, and some embeleshings on the head..... anyway I think it feels pretty good in the hand, and can't wait to use it!

Okay, I've looked through this entire thread several times. There's some -amazing- hawks in here that I absolutely love. Alot of them inspired me and I kept talking about how I was going to buy one and start modifying it but I never actually did it. This hawk here finally put the cherry on top. This thing is really beautiful. I mainly like the filework and the actual finish on the head itself. Nice job, man. I think my first one is going to be an attempt at a sort of Native American style remake. Now just to figure out which hawk to pick. Any ideas on one that would work great for trying to remake an Native American tomahawk?
 
Any ideas on one that would work great for trying to remake an Native American tomahawk?

I don't know if any one CS hawk in particular is closer to native american style since there were so many types of hawks used by people back then. May have more to do with how you deocrate it. Personally I like the new model Frontier as a platform for mods.
 
Stripped, stained, burned, ground "file-work" into spine, etched entire head, then a ferric chloride etch for the LWRC REPR logo, re-blue, then a convexed edge. Fun, big fun.

IMG_8640.jpg


IMG_8641.jpg


IMG_8636.jpg
 
Hey, quick question for the Axe forum and CS hawk modding folks. My hawk is finally done (w00t!) and I'm going to post up some photos in a bit. But as I'm used to doing long photo posts for mods in the Becker subforum, I was wanting to do a separate one for this hawk too. Any rules against that? Was this CS thread created to try to corral all CS hawk mod activity into one place? Thoughts? TIA.
 
I've never read any rules to that effect. I've put some frontier and viking axe mods in separate threads, but I like putting them here because more likely that folks will view. Your isolated thread might get buried after a few days of viewing.
 
Yep, good point. Plus I'm hurtin' for time right now and those longass threads take a longass time to prepare. So this is it for now and maybe I'll follow up later.

Trail hawk:
1. Stripped the head.
2. Smoothed out the eye and chamfered the edges with file and sandpaper.
3. I had originally planned on a smooth finish, but endless amounts of time hand-sanding with 60 and even laying into it with a palm sander didn't seem to do a durn thing. So I gave up, and you can't really even tell I tried to sand it at all. I like the 'forged' finish anyway.
4. Did a resist etch to add my Beckerhead number and a corny design.
5. Used Plum's to give it a brown patina.
6. Reprofiled the edge.
7. Sanded, stained (walnut I think), and oiled the haft.
8. Dyed hemp and epoxy handle wrap.
9. Custom sheath and collar from the mighty Goose.
10. The haft fit was particularly awful. I had to end up filling the empty 'air' between the haft and head with several layers of wood glue which I then sanded. I followed this up with some blue loctite to keep the head in place (but not permanently).

1-5.jpg

2-4.jpg

3-4.jpg

4-4.jpg

small_100_2898.jpg

5-4.jpg
 
Thanks for remembering my 11 Captain :)

IMG_3632.jpg

IMG_3636-1.jpg


And here's a group shot of all my Plum's projects. The Warthog will be getting a wood and hemp wrapped handle, the BK2 will be getting the patina sanded off since I want to use it for food and etc.

IMG_3637.jpg
 
Well I ended up doing two hawks, a pipe hawk and a rifleman's hawk. I really enjoyed the process, and I'm thinking of doing a spike hawk next after I get done doing a saiga conversion. So, details first then the pics

Pipe hawk:
Head was stripped, filework (which didn't turn out as nice as I wanted) done on the top and then given a hot lemon juice finish (made the house smell like lemons, which was nice)
The handle was sanded and stained with a poly/stain combo (minwax I think)
The wrapping is leather bootlace that was soaked before wrapping. The brass studs are upholstery tacks I got from Lowe's that pin down the ends of the wrap

2011-11-19085557.jpg


Rifleman's hawk:
Head stripped and polished. Walmart has an auto body repair kit in the auto section that has 5 different abrasive pads that can be chucked into a hand drill. I just worked my way through the different grits, took maybe a half hour and did a pretty nice job polishing out everything but the deepest pits. I used Express Blue from Brownells for the finish and am very happy with how that turned out. I've used cold blues in the past with mixed results, but with the same basic steps I got an almost black blueing with only about 5 coats.
Handle got the same finish as the pipe hawk, but I tried a different technique with the tacks and wrap. The brass wasn't sturdy enough to be hammered into the hardwood handle like I tried to do on the pipe hawk (which is why those ones look so crooked and ugly), so this time I predrilled the holes, filled the holes with epoxy and then pressed the tacks through the bootlace and into the handle. Had much more control this way and I didn't ruin quite so many tacks, plus I think everything came out looking a lot neater, and the wrap is just as tight as you could want. The top wrap has the tacks on the right side the bottom wrap has them on the left.

2011-11-19085550.jpg


And a shot of both of them

2011-11-19085541.jpg


I think I'll redo the wraps and tacks on the pipe hawk so everything looks more even and neat, but I really like how everything turned out overall
 
Back
Top