The “Can’t leave anything alone” Thread

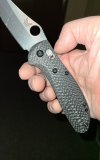
Didn't care for the colors of the XM-18 3" Wharncliffe I recently picked up. I through on a gray G10 scales with blue hardware to get my by until I can source a textured carbon fiber or titanium scale for it.

LvRo9YS.jpg

hjM2M1n.jpg

6B1WFnt.jpg

cddbGeC.jpg


I need to get a hold of J Jordan@DLT about the handle nuts I ordered though. They seem ever so slightly oversized, and I can't get them to fit flush, like the stock handle nuts, no matter what I do.

Stock handle nut is in the middle... The blue handle nuts are on either side.
7MG3E5p.jpg


16fUUMH.jpg
 
Whelp, screwing pretty hard got two of them in... But the third stripped the torx and the nut still isn't sitting flush. :(

I'm not sure if the tolerances were off a bit, or if the anodizing made them just a little too thick. But either way... Sucks. I was able to get the T6 Torx out with a Torx 6IP bit, but it's pretty stripped. There's no way that last handle nut is going to fit in there. I just tried a press fit, and no go. Guess it's time to get a hold of Hinderer.
 
Last edited:
Whelp, screwing pretty hard got two of them in... But the third stripped the torx and the nut still isn't sitting flush. :(

I'm not sure if the tolerances were off a bit, or if the anodizing made them just a little too thick. But either way... Sucks. I was able to get the T6 Torx out with a Torx 6IP bit, but it's pretty stripped. There's no way that last handle nut is going to fit in there. I just tried a press fit, and no go. Guess it's time to get a hold of Hinderer.
Chuck them in a drill and sand down the OD of the head a smidge, then re-ano👍
 
Chuck them in a drill and sand down the OD of the head a smidge, then re-ano👍

That was actually my plan with the last handle nut, but then the Torx screw rounded out so bad, that it’s no longer feasible to use it. I’m hoping Hinderer or DLT will just be willing to send me a new handle nut and torx screw.

Worst comes to worst, I just order a new set of screws and handle nuts. I’m not really interested in putting effort into fixing a tolerance issue. Especially when I paid like $100+ for some damn screws, lol!
 
Started to blacken the handle for the Zaan.

Zaan TI-BLK  11.13.21.jpg

Still a bit more work to do to even out the finish more (if possible), not bad for a first try but is very time consuming and mindful work.
Once I'm done I may decide to keep as is or tumble some, will also probably darken all of the handle hardware.

Shaman scales and blade should arrive next week from having outside work done, looking forward to seeing how they turned out and finishing that project.
 
I think I'm done, for now..
Zaan Ti-Blk.1  11.14.21.jpg Zaan Ti-Blk.3  11.14.21.jpg Zaan Ti-Blk.2  11.14.21.jpg

I did this using vegetable oil as that's what I had on hand and didn't want to use WD40 due to smell and possible flame-ups.
This gave a better result than trying a Windex / H2O solution which did ok on a test for a Ti back spacer.
There's very subtle variations in color as it's not a solid jet black, more of a very dark charcoal gray in hand.
Rubbed a small amount of mineral oil on both sides and wiped down to really make it look even.
Not bad for a first attempt and I'm happy with the results, I'll see how this wears over some time.
 
I think I'm done, for now..
View attachment 1681660 View attachment 1681662 View attachment 1681663

I did this using vegetable oil as that's what I had on hand and didn't want to use WD40 due to smell and possible flame-ups.
This gave a better result than trying a Windex / H2O solution which did ok on a test for a Ti back spacer.
There's very subtle variations in color as it's not a solid jet black, more of a very dark charcoal gray in hand.
Rubbed a small amount of mineral oil on both sides and wiped down to really make it look even.
Not bad for a first attempt and I'm happy with the results, I'll see how this wears over some time.
That turned out great!
 
Horrible lighting today with the cloud cover🤬 But, the new blasting cabinet rocks...just need to re-touch the enamel in a few spots that got blasted where mask lifted a bit at the edges.

20211115_115245~2.jpg
 
I've been following this project closely. Great artistry! The geometric patterns seem unique or random, yet harmonious when viewed as a whole.
 
I've been following this project closely. Great artistry! The geometric patterns seem unique or random, yet harmonious when viewed as a whole.
Thanks! I had a picture in my head the whole time but it's nice to finally get it all together in reality for everyone else to see😂 I'm really pleased with the "flow" if you will😁
 
Thanks! I had a picture in my head the whole time but it's nice to finally get it all together in reality for everyone else to see😂 I'm really pleased with the "flow" if you will😁
Hey, I forgot to mention you did good with the Spyderco !
I’m anxious to see what else is lurking in that mind of yours :cool:, just gotta pick another project knife.
 
Got the scales back with a rattlesnake scale pattern laser etched/engraved, this is bare with no anodizing.
I did color it a dozen different ways (1 and 2 tone), but I'm sill undecided and it does look good bare.

Shaman  11.21.21.jpg

Also removed blade etching info then tumbled for a stonewashed finish and sharpened to a 25° angled edge.

I may acid etch the blade and do some color eventually but at least I can use it again, it'll be a fun work in progress and will help me figure out how to move forward on the Kwaiback.
 
Back
Top