ChazzyP
Platinum Member
- Joined
- Dec 27, 2014
- Messages
- 8,972
I just got done cracking, cleaning, interior polishing, and relubing my F95R and shot a few pics along the way, so I thought I'd share those and a few thoughts. This was my first R series takedown and it goes just a little differently from the other Shiros I've been through. The major difference is the underlay washers which seemed to somewhat complicate reassembly, the extra component making it a bit likelier the bearing cages will fall out when trying to mate the slabs back together. I was a bit lazy this time and didn't remove the clip so that I could take out the rear post to reassemble that area last, it being much easier to concentrate on the bearings, pivot area, and stop-pin without having to worry about mating the butt of the handle at the same time. It took a couple stabs (figurative only), but with a bit of patience everything went back together nicely.
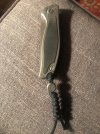
Anyway, I like to get one side apart, through all the steps, and back together before tackling the other. If I open the knife lock-side down and keep a little pressure on the blade, that side will hang together and I'll just have to account for the bearings one side at a time. Here's all those little culprits from the show side.

You can see above that the lock-side, off to the left, is still intact with the bearings and cage still in place.
Jumping ahead, here's the show side all put back together and the lock-side cleaned up and ready to put back together.

Once a slab is stripped down, the BBs set aside and accounted for, I'll clean everything with alcohol, wiping down with wood-handled cotton swabs and paper towels. Here's the field of work with parts cleaned on the left and the slab cleaned and waiting. Also there are my Revlon tweezers for the BBs and my Hedgehog tool for the Pacman screws.

I'll take the bearing cages, underlay washers, and blade tang and polish those up on an old green-loaded strop I keep for that sort of work.

Here's the slab with the underlay washer installed with 6 tiny drops of W10 NanoOil applied. There are 4 drops underneath, mostly there just to help the washer stick in place when reassembling.

The bearing cage goes on next and is rotated a bit to pull some oil up into the cut-outs. BBs go in with the tweezers and maybe get pushed in place with the wood end of a swab as they tend not to go exactly where you want them. Everything gets rotated again to move the oil around and help everything stay put for reassembly.
Going back together, I'll put the blade onto the lockside up against the stop-pin with the lock-bar engaged. This generally keeps everything in place on that side. As I mentioned earlier, if you can install the clip from the exterior it's best to leave the back post out, bring the two halves together on edge with a little pressure against the blade and mate the pivot and stop-pin. Put the aft end back together last. Even with the back post in and clip on, you can usually loosen the pivot enough to slip the standoff in and tighten everything up back there, which is what I ended up doing.
The last little step is a tiny dab of FinishLine or other light grease applied to the detent ball to smooth out the tracking through its arc. All that's left is to open the door and let your free-range bear outside to sit on a rock.

Anyway, I like to get one side apart, through all the steps, and back together before tackling the other. If I open the knife lock-side down and keep a little pressure on the blade, that side will hang together and I'll just have to account for the bearings one side at a time. Here's all those little culprits from the show side.
You can see above that the lock-side, off to the left, is still intact with the bearings and cage still in place.
Jumping ahead, here's the show side all put back together and the lock-side cleaned up and ready to put back together.
Once a slab is stripped down, the BBs set aside and accounted for, I'll clean everything with alcohol, wiping down with wood-handled cotton swabs and paper towels. Here's the field of work with parts cleaned on the left and the slab cleaned and waiting. Also there are my Revlon tweezers for the BBs and my Hedgehog tool for the Pacman screws.
I'll take the bearing cages, underlay washers, and blade tang and polish those up on an old green-loaded strop I keep for that sort of work.
Here's the slab with the underlay washer installed with 6 tiny drops of W10 NanoOil applied. There are 4 drops underneath, mostly there just to help the washer stick in place when reassembling.
The bearing cage goes on next and is rotated a bit to pull some oil up into the cut-outs. BBs go in with the tweezers and maybe get pushed in place with the wood end of a swab as they tend not to go exactly where you want them. Everything gets rotated again to move the oil around and help everything stay put for reassembly.
Going back together, I'll put the blade onto the lockside up against the stop-pin with the lock-bar engaged. This generally keeps everything in place on that side. As I mentioned earlier, if you can install the clip from the exterior it's best to leave the back post out, bring the two halves together on edge with a little pressure against the blade and mate the pivot and stop-pin. Put the aft end back together last. Even with the back post in and clip on, you can usually loosen the pivot enough to slip the standoff in and tighten everything up back there, which is what I ended up doing.
The last little step is a tiny dab of FinishLine or other light grease applied to the detent ball to smooth out the tracking through its arc. All that's left is to open the door and let your free-range bear outside to sit on a rock.
Last edited:


")