Time for a new BBQ Challenge - The Camp Sword

Great looking stuff guys!!

Well.. I finished the sword part of this. Not sure what I'm going to do for a scabbard yet, maybe try the slat method.

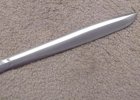
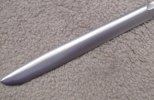
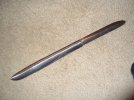
First photo is after cleaning up the blade, sanding and using some cold blue to darken the colour and keep it in line with the forge marks. Here's all the wood parts for the guard/handle/pommel. Walnut and maple. The plate is copper that has been hammer finished and heat coloured.

Gladius15.jpg


Now to inlet the copper plate. I left it slightly proud so as to leave a little of the edge exposed.

Gladius16.jpg


Gladius17.jpg


Nice fit all glued up.

Gladius21.jpg


Here's some of the handle detail including the copper pein block and the tang peined.

Gladius22.jpg


Gladius23.jpg


Gladius24.jpg


From my research, these are supposed to fit tight in the hand so that when gripping, the hand swells against the pommel and guard for a secure grip. It ended up making the maple part of the handle only 3 1/8".. (and I have large hands)

Gladius25.jpg


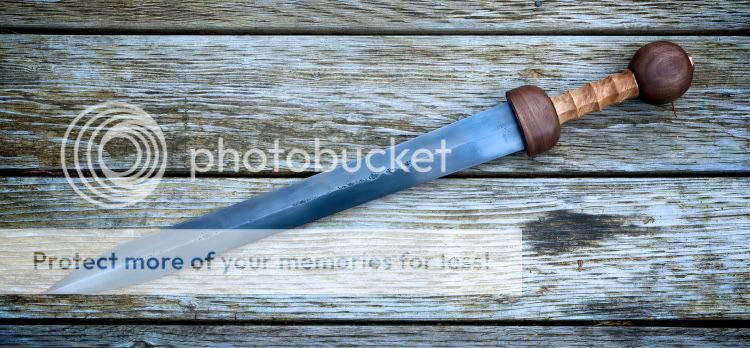
And here's a snapshot of the whole sword. The blade is 19 1/2" and is 2" wide at the guard.
**edit** better photos

Gladius100.jpg


Gladius101.jpg


Gladius102.jpg
 
Last edited:
OK, here is my go at things...I started with some 1075 that I have had hanging around for years. I bought it from admiral and never used it. I had in mind a Rich Marchand style camp sword, but we will see. I would be happy if I could even come close. Here is the steel I started with, it is 1 1/2" by 1/4"...oops, I didnt take a picture of the steel...well, it looked like a bar of steel. I am sure you can imagine what that looks like. I usually cut the tip into the bar instead of forging it. I know it probably seems like cheating, but I always get the fish lip thing, and it saves me time and propane to cut twice on the bandsaw. Here is the piece in the forge and I am getting ready to forge the bevels in.
IMG_2320.jpg


Next are a couple of shots in different stages of forging. I am having a difficult time convincing my wife that she should drop what she is doing to take pictures of me forging, so I have to do this all by myself. Subsequently, there will not be a lot of action shots. Here are the next few. (by the way, the kerosene jug near the anvil is empty, so no danger there)

IMG_2321.jpg


IMG_2322.jpg


As you can see, the bevels are forged in, and I did a decent job...if I do say so myself. It is straight and the bevels are smooth and straight, at least I think they are. I guess the trip to the grinder will tell the truth.

In this next shot, I am trying to decide what kind of handle to do. I had to cut up a paper bag to find a piece large enough to sketch it. I am leaning toward the top handle (hemp wrap, epoxy soaked with maybe some walnut or blackened oak.) I am also leaning towards the bottom grind lines. I plan on putting a hamon on this, which means I will have to hand sand it. I am not looking forward to that time at the bench but I like etching and watching it appear. Hopefully it will all work out well. I plan on keeping this to clear out some brush in my back yard.

IMG_2324.jpg


I will try to keep plugging away at this and documenting it. I am pretty bad about remembering to take pictures of my progress.
 
These are all coming along extremely nice!

On a related note: 20" of 52100 are on their way to my place. :)

Best,
Murphys Law.
 
Here's one I did for a customer...it's stubby compared to some of the swords on here, but it is definitely camp ready.

13" OAL
.300" CPM-M4 with distal taper and flat/convex grind
Satin finish....omg sooo much work ;)

101_5673.jpg
 
Some quick and dirty shots of my "campizashi".
1070 steel - forged to shape - oil quench
17" OAL; 11" ha ; 6" nakago
Shobu-Zukuri with chu-kissaki
Slight negative sori and flair toward Kissaki

I will leave the surface with a 400 grit matte finish.
Tsuka and saya will be a surprise.
Copper tsuba and koshirae.

Translation: 17" with 11" edge and 6" tang
convex scandi grind with a medium curved point
Slight downward curve with the blade getting wider toward the tip
sheath and handle will be a surprise
Copper guard and fittings.
 

Attachments

  • campizashi 001.jpg
    campizashi 001.jpg
    62.5 KB · Views: 100
  • campizashi 003.jpg
    campizashi 003.jpg
    60.1 KB · Views: 85
  • campizashi 005.jpg
    campizashi 005.jpg
    53.5 KB · Views: 75
  • campizashi 006.jpg
    campizashi 006.jpg
    54.2 KB · Views: 72
  • campizashi 007.jpg
    campizashi 007.jpg
    67.1 KB · Views: 95
I heat treated mine and it came out with a bend in it. I put two pennies on a piece of flat stainless and put a clamp in the center, put it in the tempering oven and hoping for the best. I have had a 50 - 50 success rate at getting blades straight again. The last one snapped. This one is thicker stock so hopefully it wont give me as much trouble.
 
Last edited:
I heat treated mine and it came out with a bend in it. I put two pennies on a piece of flat stainless and put a clamp in the center, put it in the tempering oven and hoping for the best. I have had a 50 - 50 success rate at getting blades straight again. The last one snapped. This one is thicker stock so hopefully it wont give me as much trouble.
Same thing here. It looks promising tho after first temper.
 
Frank - do you staighten on the first temper? I usually just temper the first round, then once the steel isn't as stressed I attempt staightening on the second temper. My chopper/sword took one penny to get it straight.
 
Frank - do you staighten on the first temper? I usually just temper the first round, then once the steel isn't as stressed I attempt staightening on the second temper. My chopper/sword took one penny to get it straight.

It is on its first temper cycle right now with the penny. I didn't clamp it as tight as the one that snappen. It will come out in about 1hr and will see how it looks.
 
It came out of the first temper nice and straight. Yes!
Glad to hear. I went with 2 pennies and had ever so slight curve
(didnt see it at first but the granite doesn't lie!) so second one went down to one penny and Im good now!
 
Glad to hear. I went with 2 pennies and had ever so slight curve
(didnt see it at first but the granite doesn't lie!) so second one went down to one penny and Im good now!

Nice!

I am going to clean up the bevels and attempt to draw back the spine, another first for me.
 
It seems to me the longer a blade is the more the gremlins come mess with me!

I got a bunch of those running around my shop too!


I drew back the spine, cleaned it up to 120 grit and put a quick 120 grit edge on it and whacked a stump. The edge held up well. I chopped a peice of brass tube and showed no chipping. I put a small convexed edge after I ground it down to .20. Its go some meat behing the edge. I didnt want to make it to thin.

IMG_20120425_134911.jpg
 
Last edited:
Back
Top