What's going on in your shop? Show us whats going on, and talk a bit about your work!

I also start to work on this one , big one .Beautiful piece of walnut . I will pay special attention. I have already made a mistake that I cannot forgive myself !!!! .I ground too much part of the edge at the ricasso !!!

UOT4H7I.jpg

J06hEIB.jpg
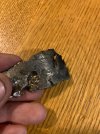
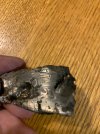
Would love to see how you do guard fit up... Looks excellent!! Great job
 
THAT could be super cool - have not heard much about Stuart recently…or maybe I’m not looking in the right places

VERY talented guy!

Bill
Stuart's been under the radar, he's had a bit of a rough go. When this knife is complete he'll get half the $ when it sells, and I think more importantly it's no longer cluttering up his shop.
It's a tall order for me, this one is, but I hope my efforts prove worthy of- I'll say it- The Master.
 
I'm sorry to hear that - I have several of his knives and they are exceptional...plus he's a great guy to boot!
hoping he's doing better

I'm sure you'll do this one justice!
 
You know what I really hate ? You grind nice and LIGHT blade and then you add guard which weight 2/3 of blade .... ??? Well , holes lot of them make guard lighter . The butcher will pay dearly ... for every hole, meat for one lunch for five 🤣
s1arDYi.jpg
mill out the guard .. it does not look too bad to do .. a U shape.. taper the blade and tang next time...
 
Just got done a batch of knives. I dont have a membership anymore, and its a pita to post them somewhere and link busy atm.

Its 2 10v blades. 66.5 hrc, a gyuto, and nakiri

3 m4 blades, 68 hrc, 2 gyutos and a santoku

1 gyuto in s90v, at 64 hrc

1 gyuto in m2 at 66 hrc i believe. I need to find the pics of the test to verify before i post that up for sale.
 
I through some meteorite in a canister packed with charcoal today I need to give it a second go to check some things and verify what going on but things look promising the pieces have had a few sparks and an etch looks like good results can be achieved.
quick update adding some pics.

got some solid bars forged out of the stuff to give it another go
what I think is going on is the iron in the widmanstatten pattern is absorbing carbon and the nickel striations bordering just highlight
the pieces would normally etch a very light grey on the iron compared to the images where a dark gray almost black can be seen this what I meant be things look promising.

it things work out well a knife might be able to be made from solid meteorite alone and the metal somewhat use able,not the best steel but better than just pure iron
 

Attachments

  • blister m5.jpeg
    blister m5.jpeg
    142.1 KB · Views: 8
  • blister m7.jpeg
    blister m7.jpeg
    116.7 KB · Views: 9
Last edited:
Other than grinding some fresh steel, working on a fixed blade with another first for me...first pinned/peened steel bolsters on a tapered tang with dovetail scales. Dry fit up went well. Hollow ground S90V, 416 stainless and Ivory G10.

LVLpZhg.jpg

87g81Sq.jpg
 
So recently I had made a camp knife that I really liked but I could not get the handle right since I had used overly thick liners and a G10 stripe. It was just too blocky not grinding into the liners. So today I decided "screw it" and decided to grind past the liners to make the handle comfortable for my hand. This was not the look I was going for but it ended up kinda cool having the liners exposed on the side giving a interesting layered look. I may experiment with this look a little more and see what other cool looks I can make with other colors.

20231127_100828.jpg

 
So recently I had made a camp knife that I really liked but I could not get the handle right since I had used overly thick liners and a G10 stripe. It was just too blocky not grinding into the liners. So today I decided "screw it" and decided to grind past the liners to make the handle comfortable for my hand. This was not the look I was going for but it ended up kinda cool having the liners exposed on the side giving a interesting layered look. I may experiment with this look a little more and see what other cool looks I can make with other colors.

View attachment 2405035

I've found that sometimes mistakes can be a blessing in disguise,it looks good has a kinda window frame to it.
 
So recently I had made a camp knife that I really liked but I could not get the handle right since I had used overly thick liners and a G10 stripe. It was just too blocky not grinding into the liners. So today I decided "screw it" and decided to grind past the liners to make the handle comfortable for my hand. This was not the look I was going for but it ended up kinda cool having the liners exposed on the side giving a interesting layered look. I may experiment with this look a little more and see what other cool looks I can make with other colors.

View attachment 2405035


I really like the materials in there! I like to align micarta pins so the layers in the two pins are in the same direction
 
My brother in-law builds and maintains bike trails here in Washington and came across a western red cedar that had fallen on the trail and had to be processed/removed... And it just happened to have a nice burl on it larger than a beach ball. :D

This thing weighs over 100lbs, so I'll probably have to break out the chainsaw to slab it up for drying.

Diplaps.jpg
want some!!!
 
I also start to work on this one , big one .Beautiful piece of walnut . I will pay special attention. I have already made a mistake that I cannot forgive myself !!!! .I ground too much part of the edge at the ricasso !!!

UOT4H7I.jpg

J06hEIB.jpg
Fitting handle . . . .. It is little tricky , tang is pretty long

NMU7qdi.jpg

QGq2djM.jpg

cUM35Cg.jpg


Far away from home :) I like to make slot tight fit like guard so don t forget that you can always remove more material , but you can not add .And I don t like lot of epoxy inside 🤣

eK4pR1e.jpg


Home ........... sweet home ;)

IO8SIG5.jpg


Drilling hole /3mm/ for pin , through the wood HSS drill bits then carbide for tang , it s hard as blade .

dZsabAh.jpg

MiZo64V.jpg


Glued , this time I open slot in wood perfectly in all direction .....it will be easier to me to shape the handle

4rq7ufz.jpg

XNpjdWu.jpg


Now hard part ...............hand sanding :mad:

1PBTril.jpg


I forget ...when I was thinking that I done slot I used wooden hammer to fit wood on tang , just a few millimeters, a light blow and that's it .Well , it took me an hour to pull out the handle, I almost destroyed it 🤣
 
Last edited:
Back
Top